This article we will guide you how to use Section Breaks in Word in the most general way. Help you create an automatic Table of Contents with different sections. Or when you want to create a horizontal page in the middle of the text. Or create a cover page with a separate format in the easiest and fastest way.
Nội dung
1. Concept of Section Breaks
2. Details on how to use Section Breaks in Word
Step 1: Place the mouse cursor at the beginning or end of the paragraph you want to break.
Note: It is possible to break in the middle of the page, not necessarily at the top or bottom of the page.
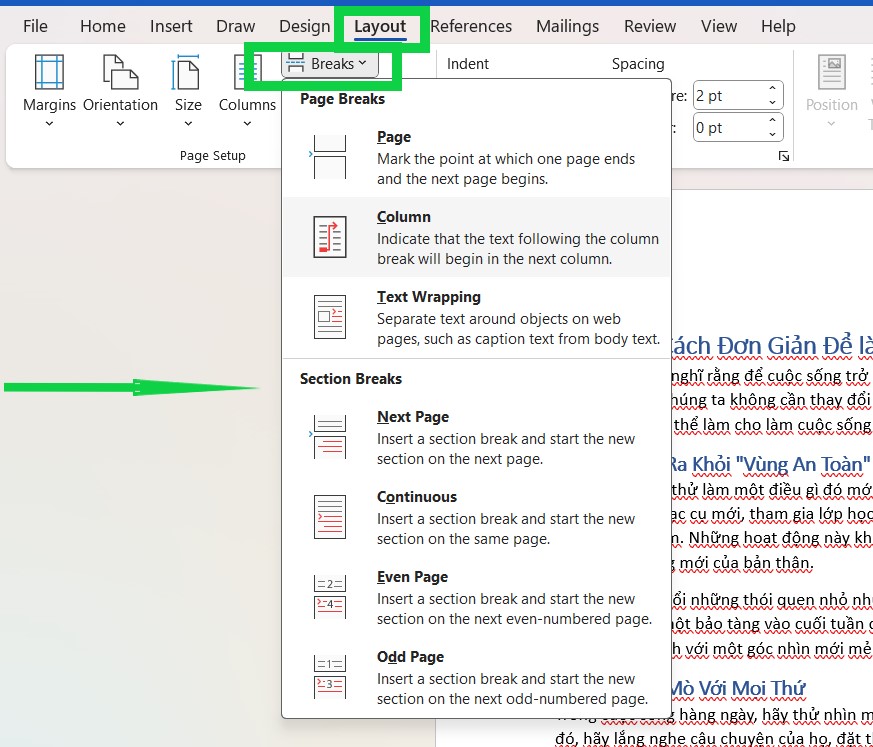
Step 2: On the Layout tab > Page Setup group > Breaks
The display panel will drop down as follows:

Step 3: Select one of the functions:
- Next page: Break a paragraph to move to the next new page, meaning if the break is in the middle of a paragraph, the next section will go down to a new page.
- Continuous: Break in the middle of the page at that position and the next part does not jump to a new line, used when dividing a paragraph within the same page
- Even Page: Even Page Break – Creates a new section starting on the next even page
- Odd Page: Odd Page Break – Create a new section starting on the next odd page
Step 4: Check the Section Breaks locations in the text
Go to the View tab, Views group > Draft
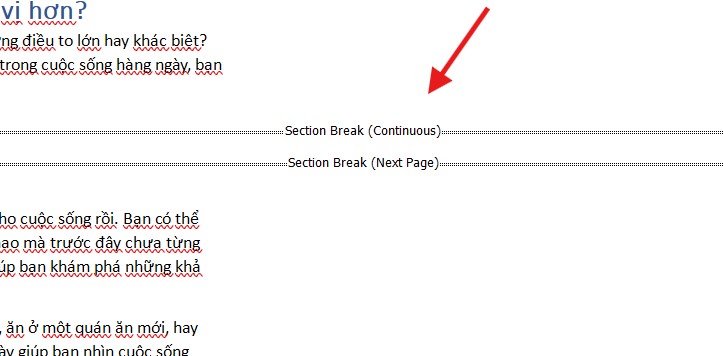
The positions will appear between the paragraphs as shown:

3. How to Delete Section Breaks in Word
To delete a Section Break in Word, follow these steps:
Step 1: Display Hidden Formatting Marks
- On the ribbon, go to the “Home” tab.
- Click on the “Show/Hide ¶” button (¶ symbol in the Paragraph group).
- This will display all hidden formatting marks, including Section Breaks.
Step 2: Locate the Section Break to Delete
- Once hidden characters are visible, you will see Section Breaks in the document as:
- “Section Break (Next Page)”
- “Section Break (Continuous)”
Example:
Step 3: Delete the Section Break
- Place the cursor just before the Section Break line.
- Press the Delete key on your keyboard.
Note:
- You can also place the cursor after the Section Break and press Backspace.
- The Section Break will be removed, and the sections before and after will merge into a single section.
Step 4: Check the Formatting After Deletion
- Deleting a Section Break may affect formatting (e.g., headers, footers, page numbers, or page orientation) because the sections will merge.
- Double-check and adjust:
- Page Orientation (Portrait/Landscape)
- Headers and Footers
- Page Numbers
Bulk Deletion of Section Breaks
If there are multiple Section Breaks in the document and you want to delete all of them at once:
- Press Ctrl + H to open the Find and Replace dialog box.
- In the Find what field, type:
^b(this is the code for Section Break). - Leave the Replace with field blank.
- Click Replace All.
- Word will automatically delete all Section Breaks in the document.
- Review the document to ensure the formatting is still correct.
4. Some notes when using Section Break
1. Section Breaks Affect Document Formatting
Section Breaks allow each section in a document to have its own formatting, such as margins, page orientation (portrait or landscape), headers and footers, number of columns, and page numbering. However, if you delete a Section Break, the formatting of the following section will automatically apply to the previous section, which can unexpectedly alter your document layout.
Example: If you have a landscape page between portrait pages and delete the Section Break, the landscape page will revert to portrait format like the others.
2. Display Section Breaks for Easier Management
Section Breaks are hidden characters in Word, so you won’t see them unless you enable their display. To show Section Breaks:
- Go to the Home tab > Click the ¶ (Show/Hide) icon in the Paragraph group.
Once enabled, Section Breaks will be clearly labeled (e.g., “Section Break (Next Page)”), making it easier to manage and delete them when necessary.
3. Be Careful When Deleting Section Breaks
When you delete a Section Break, the two adjacent sections will merge into one, and the formatting of the second section will apply to the entire merged section.
Note:
- Before deleting, make sure you understand and record the formatting of each section.
- If you need to keep separate formatting, adjust each section individually before removing the Section Break.
4. Use the Right Type of Section Break for Specific Purposes
- Next Page: Starts a new section on the next page, ideal for separating chapters or applying different page formats.
- Continuous: Splits the current page into sections, suitable for changing the number of columns or specific formatting within the same page.
- Even Page / Odd Page: Starts a new section on the next even or odd page, commonly used when creating books or documents that require fixed page alignment.
Using the correct type of Section Break ensures better control of your document and avoids formatting issues.
5. Label Sections for Easier Navigation
In large documents, excessive use of Section Breaks can become confusing. To manage them more effectively:
- Label sections in the Header or use Comments to mark each section.
- This makes it easier to track and edit specific parts of the document without missing anything.
Using Section Breaks in Word is an important technique in creating and formatting different types of documents. Experiment and take advantage of the flexibility of Section Breaks to create unique and professional documents!
