Numbering in Word is one of the simple tricks that anyone using Word should know. If you often work with tables in Word but still don’t know how to number rows in Word, it’s time to add this skill to your toolbox. Below is a detailed step-by-step guide for your reference.
Nội dung
4 ways to number in Word
Some people need to number the lines, each line is a different paragraph; but some people also need to number the lines in a table. Below are detailed instructions on 4 ways to number in Word, follow to understand specifically.
1. Numbering in Word on the same column
You have a table of data in Word that needs to be numbered. In which the rows that need to be numbered are in the same column. This is the most common situation, and also the easiest to number in just a few simple steps as follows:
Step 1 : Open the Word file that needs to be numbered, place the mouse cursor on the first line that needs to be numbered.
In this example, I will number the STT column and place the mouse cursor on the line right below the STT.
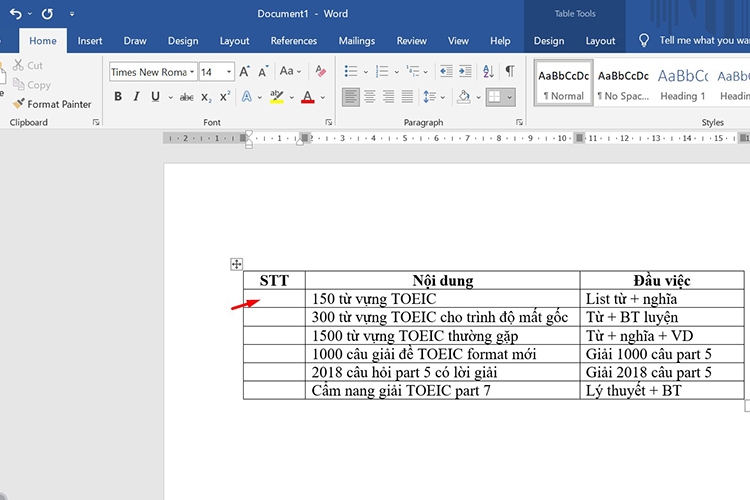
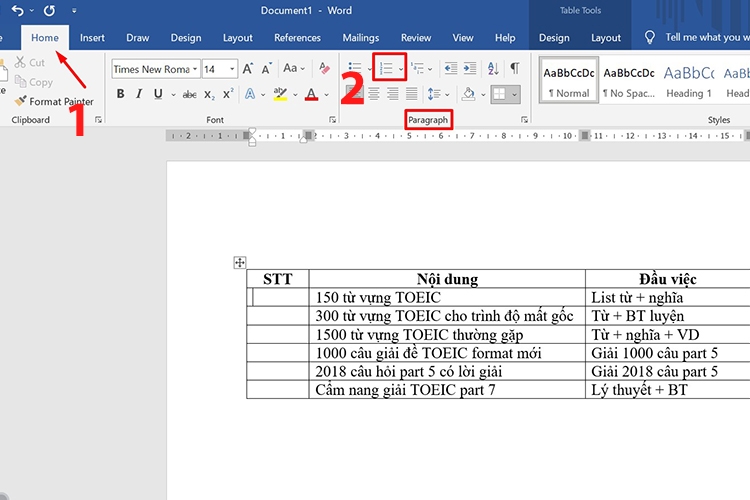
Step 2 : Click on the Home tab on the Menu bar > In the Paragraph section, click on the Numbering option .
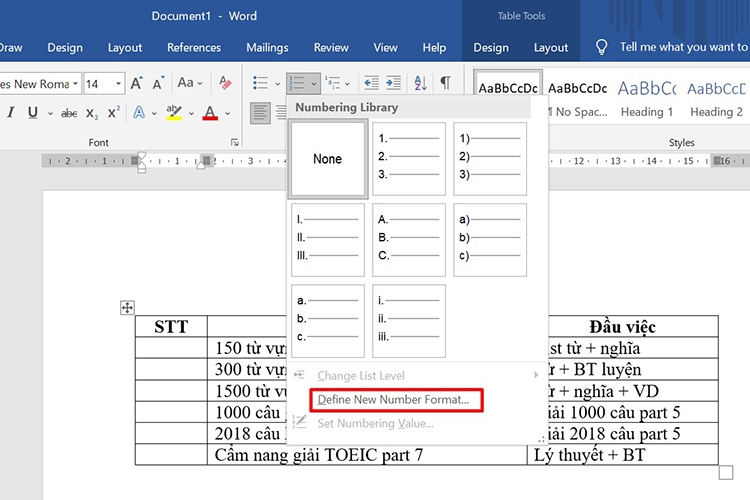
Step 3 : A list of numbering styles will drop down. Next, click on the Define New Number Format… line.
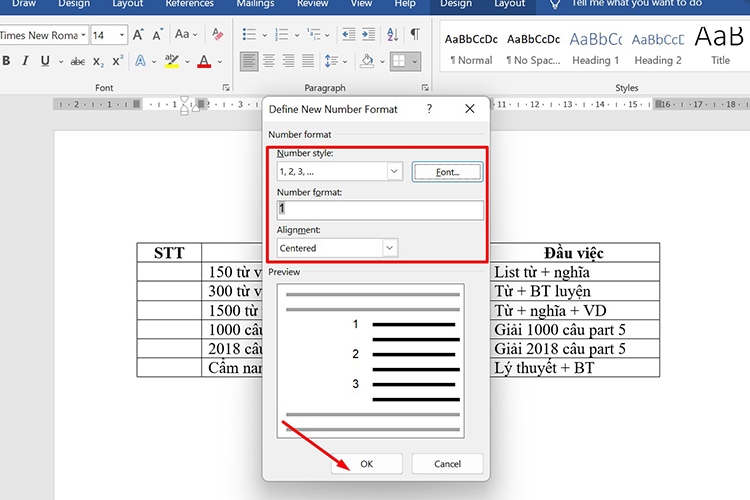
Step 4 : The Define New Number Format dialog box opens and you will change the customizations for the serial number including:
- Number style : Here you can choose natural numbers (1, 2, 3,…), Roman numerals (I, II, III,…), letters (A, B, C,…) and many other number styles. Next, click on the Font box to choose the font, font style (uppercase, bold, italic,…), size, color,…. then select OK .
.jpg)
- Number format : Remove all other characters and leave only the number characters (remove the “.” after the number 1).
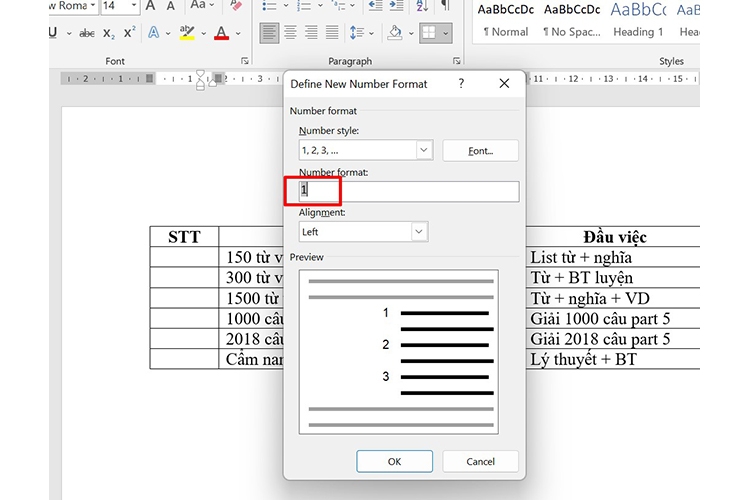
- Alignment : If you want the number to be on the left side of the cell, select Left ; on the right, select Right , and when you select Centered , the number will be in the center of the cell.
Once you’ve finished adjusting everything, select OK to close the dialog box.
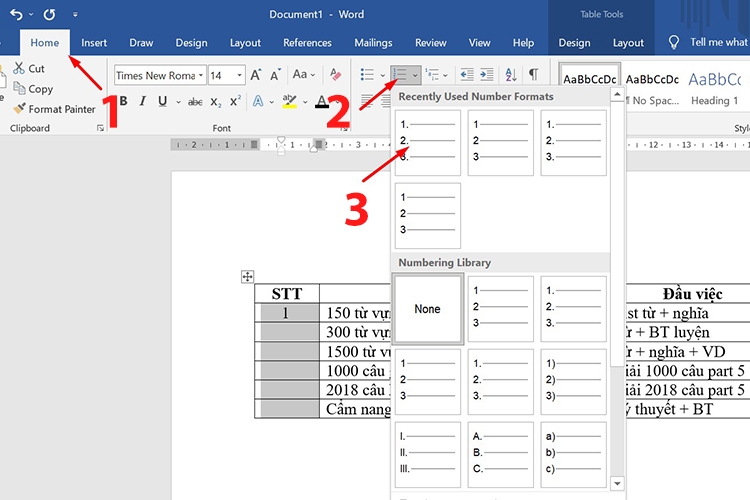
Step 5 : Now, you will get the result in the first cell in the table. To number the cells below, you will highlight the column > Select the Home tab > Select Numbering and select the numbering style you just set up.
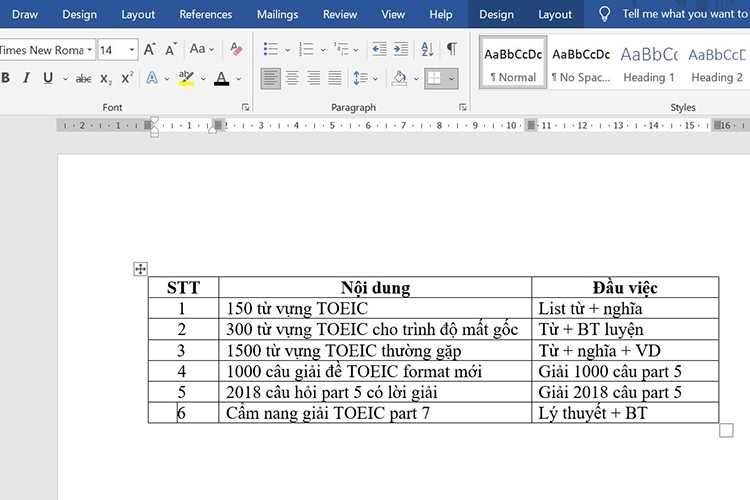
The result is that all the cells in the column you selected will be numbered in the order you want.
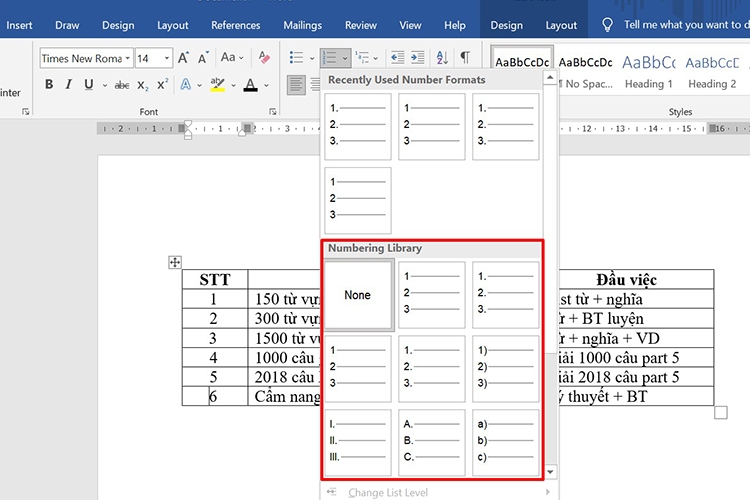
Note , in step 3 you can choose one of the suggested numbering styles in the Numbering Library section , but the format of the number may not be as you wish and you will have to reformat it later (size, color,…). Therefore, you should go to Define New Number Format to format it from the beginning.
2. Numbering in Word sequentially on 2 different columns
In case your data table has 2 columns that need to be numbered and the next column follows the previous column, the numbering is done as follows:
Step 1 : First, number the first column according to the instructions above. Then highlight the second column > Select the Home tab on the toolbar.
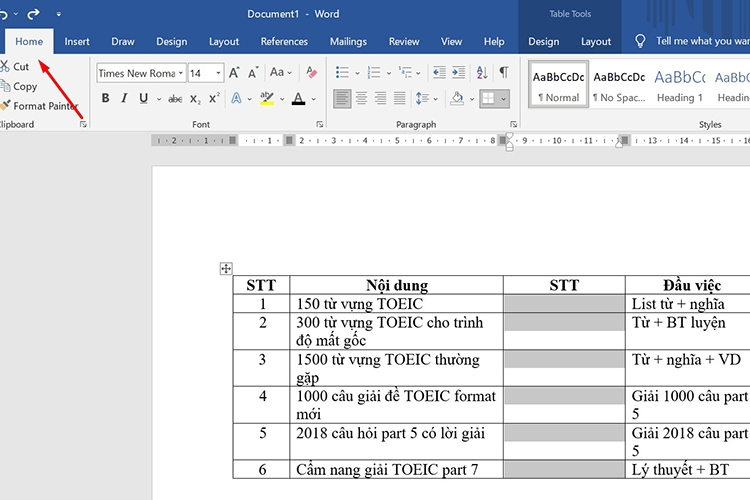
Step 2 : Click on Numbering and select the order format applied to the first column.
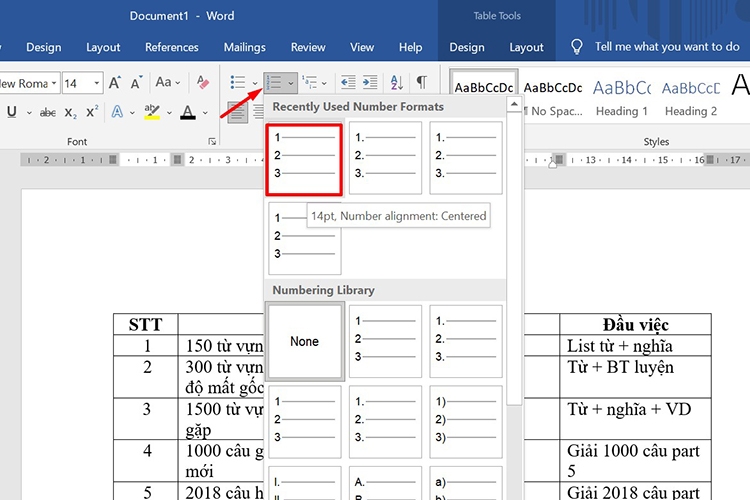
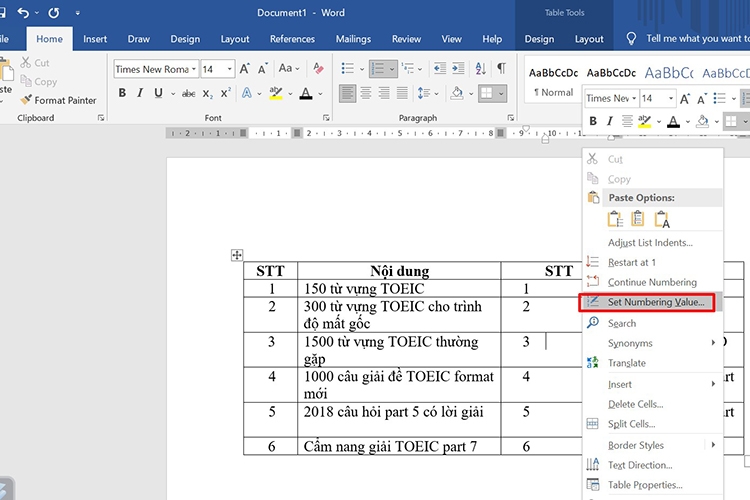
Step 3 : Now, the second column will be numbered in order but not following the first column but starting from number 1.
Place your mouse cursor in any cell in column 2 > Right click > Select Set Numbering Value .
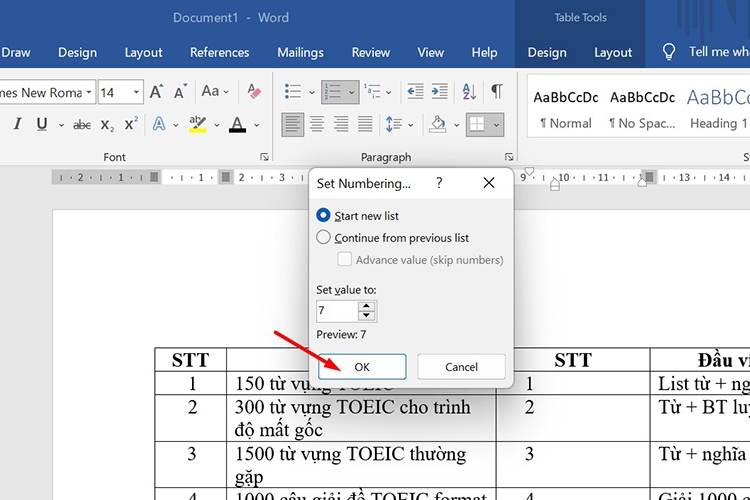
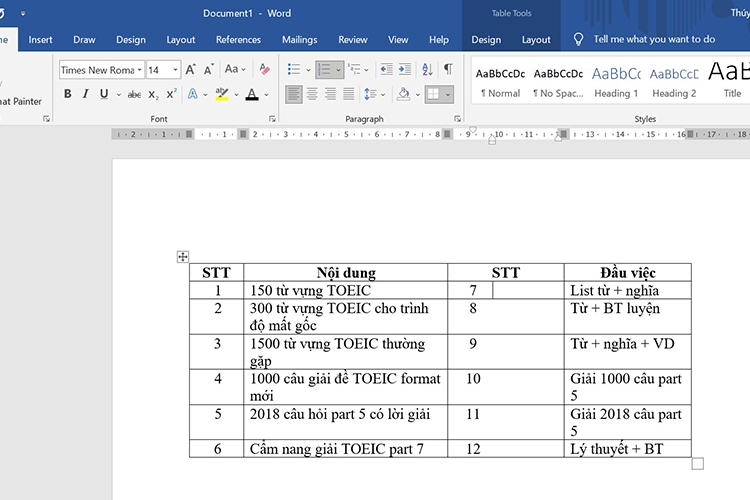
Step 4 : The Set Numbering dialog box appears, tick the Start new list box then enter the serial number following the serial number in the first column > Select OK to save the changes.
The results are as follows:
3. Numbering in Word starting from any number
The starting order number is not always 1. To number a sequence in Word from any other number, do the following:
Step 1 : Highlight the column you want to number > Select the Home tab > Select Numbering > Select the numbering style set above.
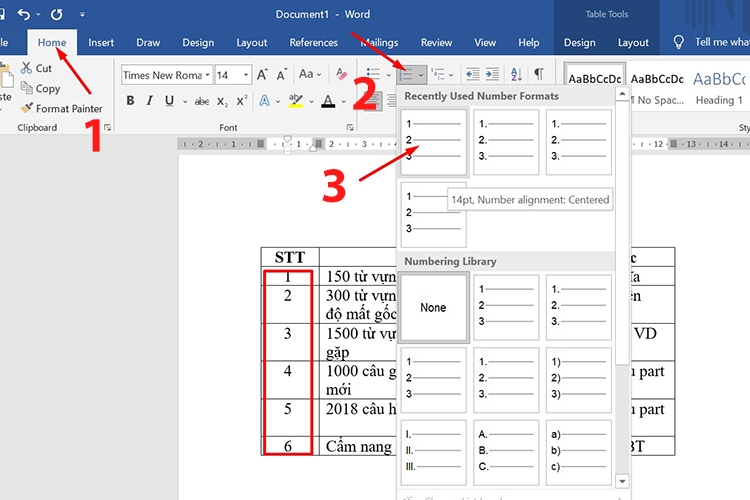
Step 2 : When the cells in the column have been numbered. To change, right-click on any cell in that column > Select Set Numbering Value .
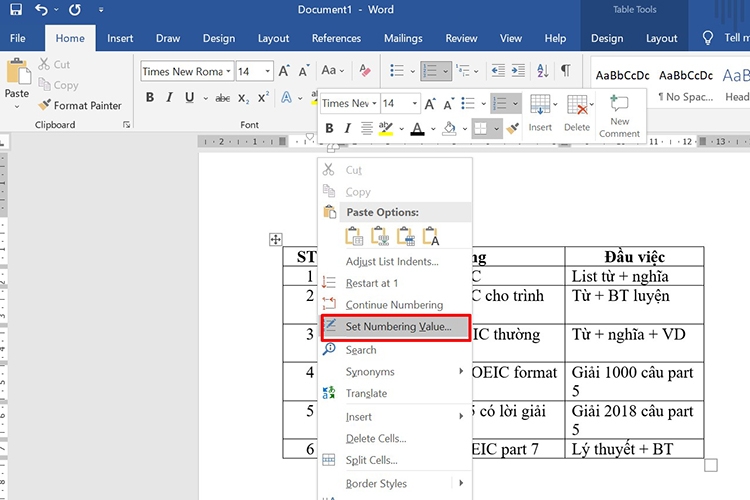
Step 3 : At this point, the Set Numbering window appears, in the Set value to section , enter the starting number you want and then click OK to complete.
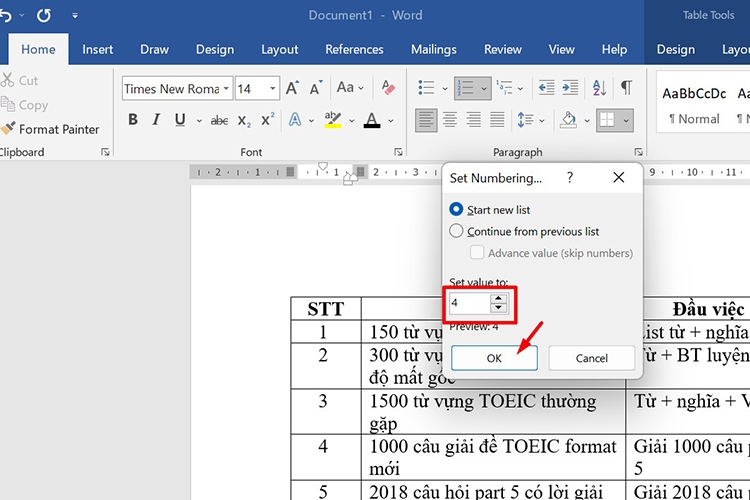
The result will be the serial number that will be assigned from the number you just entered.
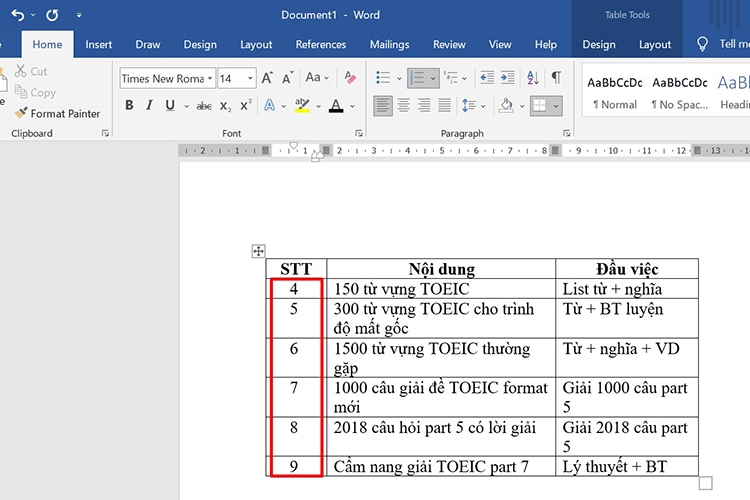
4. Numbering paragraphs in Word
In case the data that needs to be numbered is not in a table but in lines or paragraphs, the way to number the first line is not much different. You do as follows:
Step 1 : Open Word file > Highlight the lines that need to be numbered.

Step 2 : Select the Home tab > Select Numbering > Select Define New Number Format then adjust the settings of the serial number as you wish.
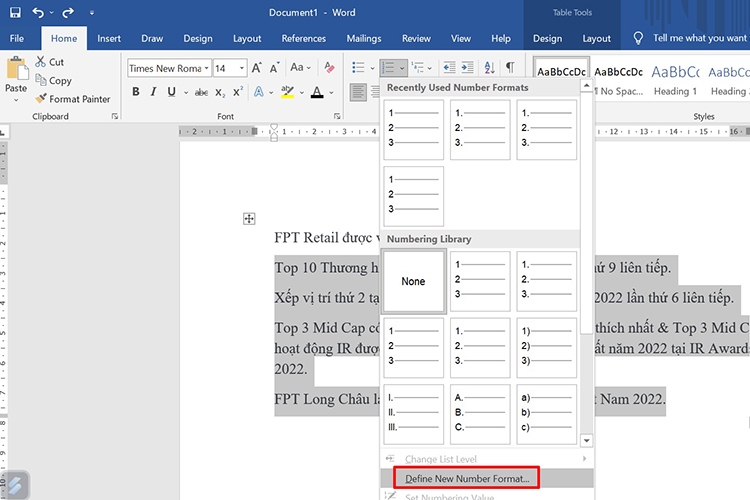
Step 3 : Highlight the lines that need to be numbered > Select Numbering > Select the setup style you just created.
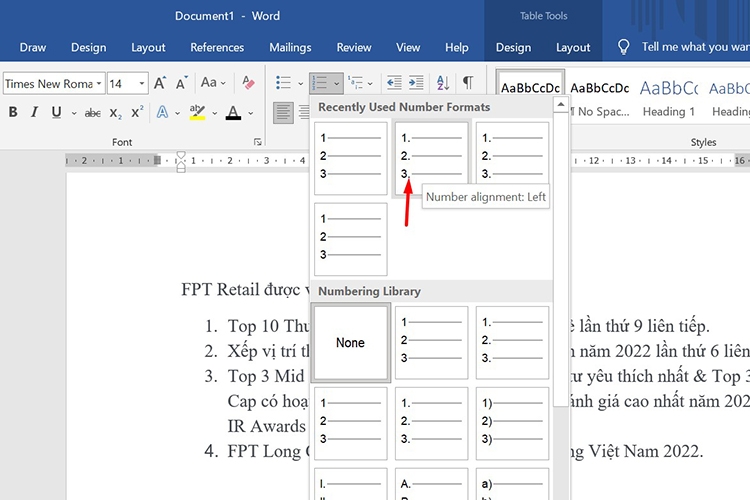
So the lines have appeared with serial numbers.

How to delete serial numbers in Word
How to number in Word is clear, so how to delete the number? The steps are very simple as follows:
Step 1 : Open the Word file containing the numbered data > Highlight the numbered column.
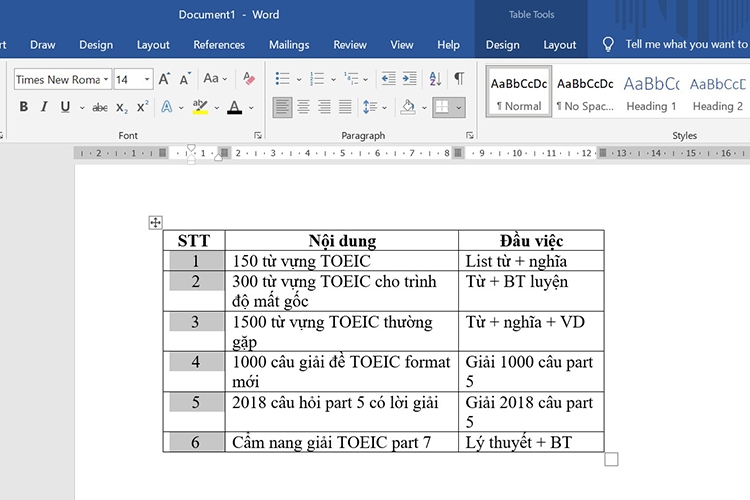
Step 2 : Select the Home tab > Select Numbering > In the Numbering Library section , select None . The serial number will disappear.
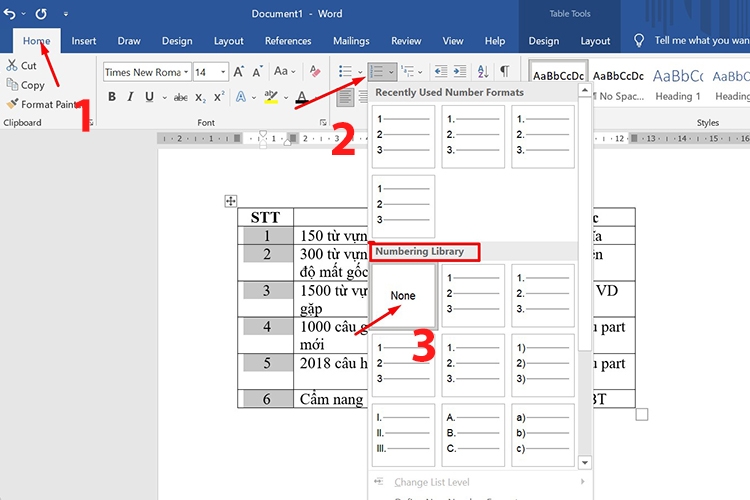
The steps are performed on Microsoft Word 2016. Other versions will be slightly different but the basic process is the same.
Benefits of numbering in Word
Knowing the numbering technique will save you time and effort. Instead of manually entering the numbering, you only need a few simple steps to number a table of data with dozens or even hundreds of rows. Formatting adjustments can also be done in just a “minute”, applied simultaneously, without worrying about omissions.
Numbering in Word creates a logical structure for your document. When each section or item is numbered sequentially, readers can follow information from one item to the next in a more natural and seamless way. Numbering also allows you to arrange items in a specific order. This is useful when you need to rearrange information in a document or create a prioritized list.
After numbering in Word, when you add a new item or delete an item, Word will automatically adjust the serial numbers in the entire document. This helps you save time and ensure accuracy because if you do this manually, it is inevitable that there will be mistakes and omissions.
Conclusion
The above article has guided you in detail on how to number in Word. Each step has a detailed illustration, hopefully this sharing will help you learn another basic Word trick to support your work.
source: fptshop
See more: How to Rotate Any Page Horizontally in Word the Simplest Way
