Knowing how to create dots in Word will help you save time when making a table of contents with many dotted lines. Or when presenting blank content that needs to be filled in as dotted lines. Compared to continuously pressing the (.) button on the keyboard, using tools and shortcuts will be faster and more beautiful. This article will provide all the simplest ways to create many dotted lines in Word. See now!
Nội dung
1. How to use Tab to create dots in Word
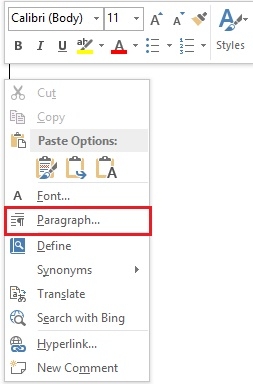
Step 1: You need to set up on the Paragraph dialog box. Right-click on the Word document, then when a quick-execution table appears, move the mouse and click on the “Paragraph” item.

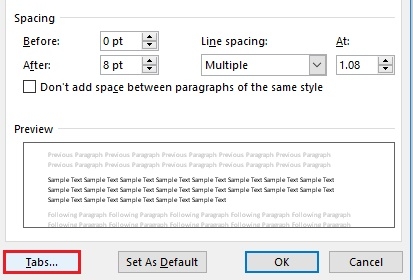
Step 2: The Paragraph dialog box appears, move your mouse to the bottom to select “Tabs” to open the Tabs control panel.

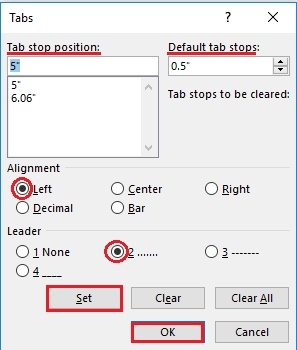
Step 3: In the Tabs panel, the software allows users to select the following features:
- Tab stop position: Left alignment feature, the length of the text will appear as a dot when the user presses Tab.
- Default tab stops: the distance from start to end when the user presses the Tab key.
- Alignment: margin style, can choose Left – left, Center – middle, Right – right…
- Leader: formatting style when user presses Tab.
You choose the values as you want and then click on “Set” to change. Then, you click on the “OK” button if you finish setting up the Tab.

Finally, the Tab creation process is complete and you have the following result:
With the automatic dotted line feature in Word, you can create paragraphs with multiple dots on a line. After setting up, you just need to press the Tab key on the keyboard to create dotted lines in Word without having to bother typing or holding down the key.
2. How to create Tab on Ruler
Users can create dots in word by creating tabs on the ruler bar very simply.
Step 1: You need to open the Ruler bar. If it is not open, click on View and check the “Ruler” box.
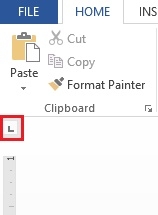
Step 2: You can determine the length of the Tab by left-clicking on the Ruler bar. Then, you adjust the Tab icon you need to use at the top position of the left ruler bar.

Step 3: Place the mouse cursor at the position where you want to place the Tab. Then, move the mouse over the Ruler bar and click on a position you want.
Step 4: You select the correct mouse point at the tab that needs to customize the tab format. Next, you double-click, a table will appear.
Now you select the correct tab you want to change the format and select the format type below. Click on “Set” to save the changes.

Step 5: After selecting, the last step is to press the Tab key on the keyboard at the cursor position. So the job of creating a dot is complete.
3. How to remove Tab and period in Word
If you don’t want to use Tab in Word anymore, you can follow these steps to remove the dots:
- Select one or more text paragraphs positioned by Tab marks.
- Press and hold the left mouse button on the Tab mark on the ruler. Next, drag the mouse up or down so that it is away from the ruler. Finally, release the mouse button and the Tab mark will disappear.
- If you select the wrong text with Tabs, the Tab mark will not appear or will be blurred.
- After removing the Tab key and the text is not in the right place, you can delete the spaces in front. The purpose is to bring the text to the beginning of the line.
Above are the shares on how to create dots in Word using tabs, hopefully it has brought you useful knowledge. Please share the article widely for everyone around to refer to.
