Having lines too close together makes your text look unsightly and makes it difficult to read the words. Don’t worry, this article will guide you on how to space lines and adjust line spacing in Microsoft Word very simply. Follow along!
Nội dung
1. Line spacing in Microsoft Word using Paragraph
Method 1: Select available parameters in Word
To be able to space lines in Word using Paragraph, on the Home tab, click the line spacing icon in the Paragraph section > Select the line spacing parameters as you wish.

Method 2: Set any line spacing parameter
Step 1 : Go to Home > Click on the line spacing icon in the Paragraph section > Select Line Spacing Options .

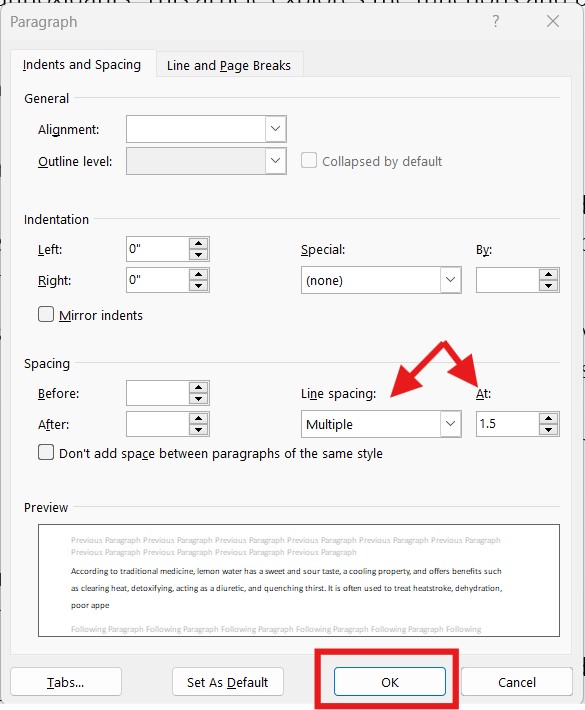
Step 2 : In the Line Spacing section , select Multiple > Enter the line spacing parameters in the At section > Click OK to complete.

Step 3 : Display results.
Method 3: Open Paragraph directly using the Home tab
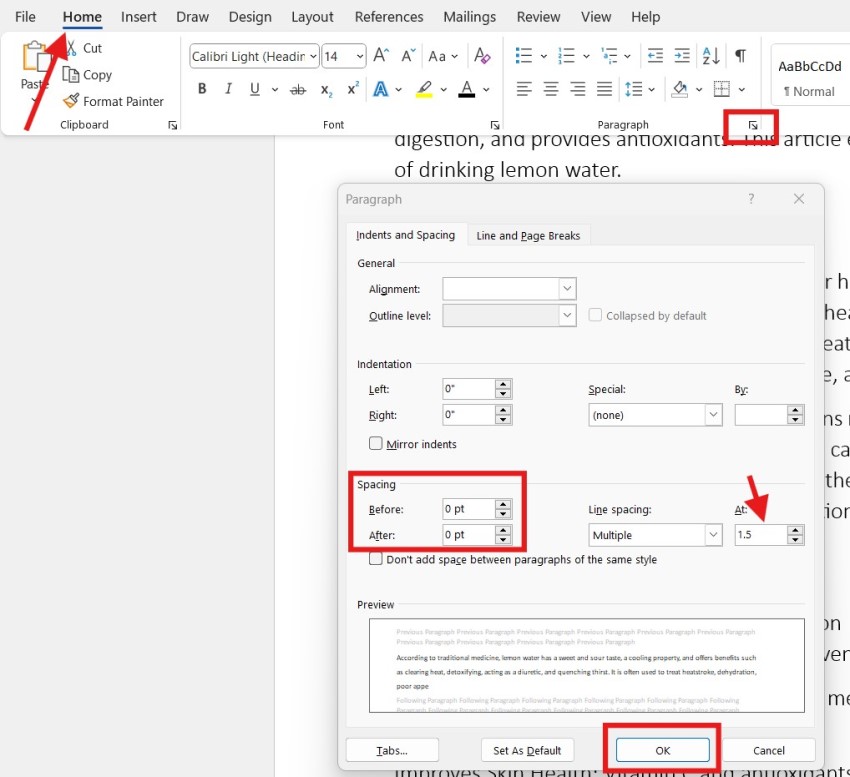
Step 1 : On the Home tab , click the right arrow in the Paragraph group .

Select the right arrow in the Paragraph group
Step 2 : In the Indents and Spacing tab , select Before to space the top part of the text or After to space the bottom part of the text > Enter the line spacing parameters in the At section > Click OK .
Enter parameters in the Before, After and At fields.
2. Line spacing in Microsoft Word using Spacing in Layout
To perform line spacing in Word using Spacing, go to Layout > Click the up/down arrow button or enter parameters directly into the Before and After sections to adjust the spacing before and after the paragraph.

3. Use shortcut keys to space lines in Microsoft Word
In addition to the above 2 methods, there is another extremely quick way to space lines in Word using shortcut keys. Here are the instructions:
- Single line spacing: Use the shortcut key ctrl + 1.
- Line spacing 1.5: Use the shortcut key ctrl + 5.
- Double line spacing: Use the shortcut key ctrl + 2.
How to space lines in Word with this shortcut tip will help you save a lot more time than the above methods.
4. Adjust line spacing for the entire text
In case you want to apply line spacing in word to all text in the file, do the following:
- Step 1 : First you need to find the Home toolbar , then select the expansion arrow in the Paragraph group.
- Step 2: Set the desired line spacing in the Line Spacing section.
- Step 2 : After setting up the options in the Line spacing and At boxes > Select Set as Default .
A message will appear asking if you want to apply line spacing in Word to the entire text you are about to import. Then select This document only. (apply only to this document file) > Finally, click OK to confirm.
There is also another way which is to use Styles :
- Step 1: On the Home toolbar , right-click Normal in the Styles section .
- Step 2: Then select Modify .
- Step 3: In the Formatting section , select the line spacing you want.
- Step 4: After selecting the desired spacing, click OK to apply it to the entire text.
Above is a summary of ways to space lines in Word, hopefully this article is useful to you and helps you know how to use the line spacing tool. In general, this way of spacing lines in Word is quite simple and extremely necessary for those who use it.
See more: Summary of 4 ways to number in Word quickly and simply
