If you have prepared a table in Excel and are looking for a way to copy the table from Excel to Word on a Word page, let’s explore 4 methods of copying a table from Excel to Word in a simple way.
Nội dung
1. How to copy a table from Excel to Word: Copy Paste
Using the Copy Paste feature is the most basic way to copy an Excel table to Word with the shortcut keys Ctrl+C and Ctrl+V. The steps are as follows:
Step 1: Select the entire Excel table and press Ctrl+C or right-click and select Copy.
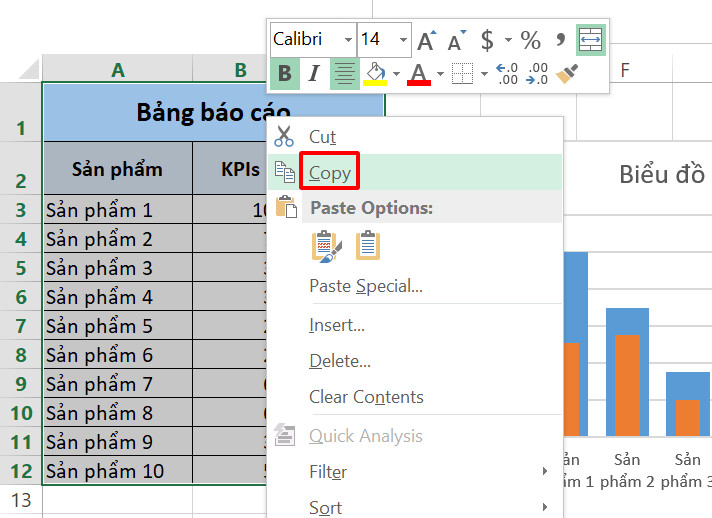
Step 2: Switch to the Word file and place the mouse cursor where you want the table to appear.
Step 3: Press Ctrl + V or go to the Home tab > on the Clipboard group > Paste .
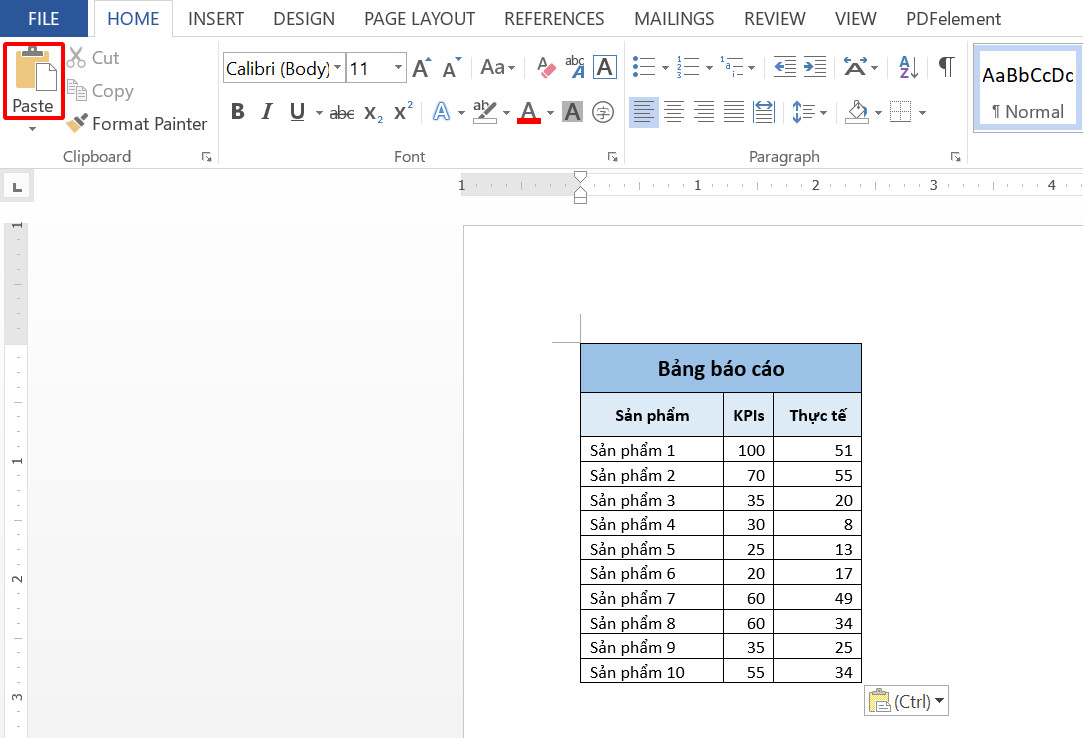
As you can see, the entire Excel table has appeared on the Word paper after just a few clicks, but the table size is not beautiful. The way to copy from Excel to Word to fit the paper is to click and hold the mouse between the lines of the table to change the size to best fit.
Change format when copying table from Excel to Word
If you want to reformat your table after transferring data from Excel to Word, pay attention to the Ctrl icon located in the bottom right corner of the pasted table.
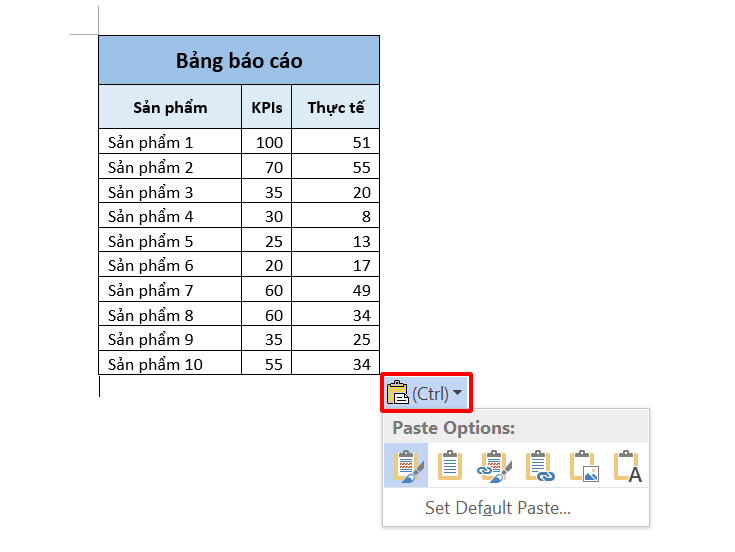
When you click on this icon, you will see a list of data format options, specifically as follows:
- Keep Source Formatting (default): Paste the table and keep the original Excel table formatting.
- Use Destination Styles: Paste the table and convert it to Word’s current format.
- Link & Keep Source Formatting: Paste the link to the table and keep the original Excel table formatting.
- Link & Use Destination Styles: Paste the link to the table and convert the table to Word’s current format.
- Picture: Paste the image of the Excel table.
- Keep Text Only: Paste only text in Excel table.
Note that when you choose Copy Paste the Excel table link to Word instead of normal Copy Paste, when you change the data in Excel, the table in the Word file will also be automatically updated.
2. How to copy from Excel to Word using a table containing self-updating links
With this method, we will use the Paste Special feature to create a link to the original data table to automatically update the data when there are changes.
Paste Special feature in Word
Normally, when you use the shortcut key combination Ctrl+C – Ctrl+V , the system will paste both the data and the original format by default. If you want to change this paste format, Paste Special is the feature you need.
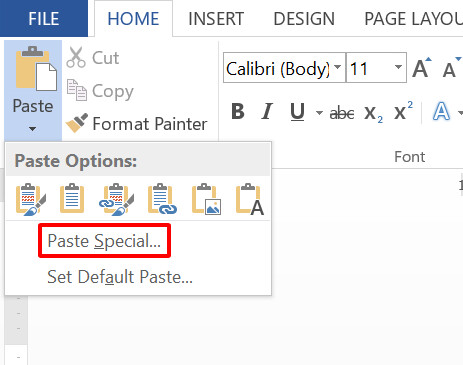
You can find Paste Special at Home tab > Clipboard group > Paste > Paste Special.
How to copy a table from Excel to Word so that the data automatically updates
Continuing with the data table in the above section, we will follow the steps below:
Step 1: Select the entire Excel table and press Ctrl+C or right-click and select Copy .
Step 2: Switch to the Word file and place the mouse cursor where you want the table to appear.
Step 3: Go to the Home tab > on the Clipboard group > arrow under the Paste icon > Paste Special .
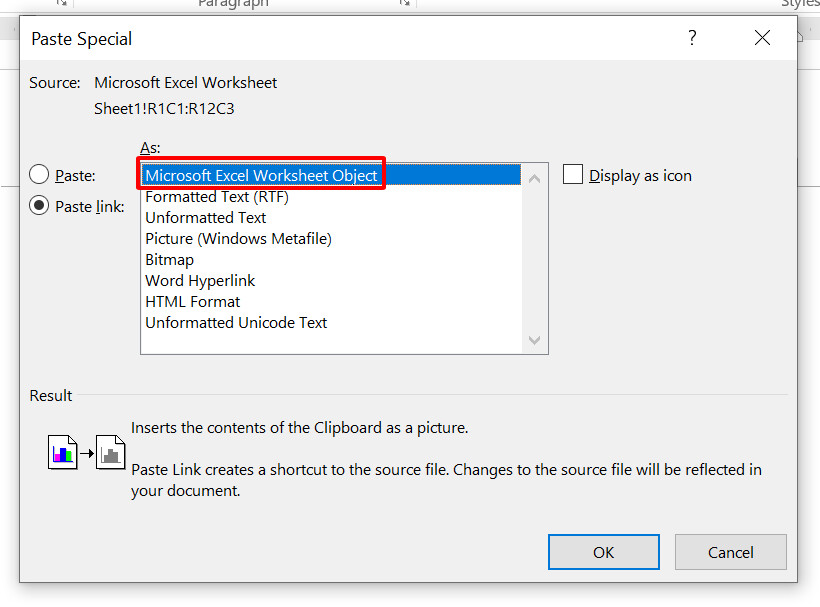
Step 4: Select Paste link > Microsoft Excel Worksheet Object > Then click OK .
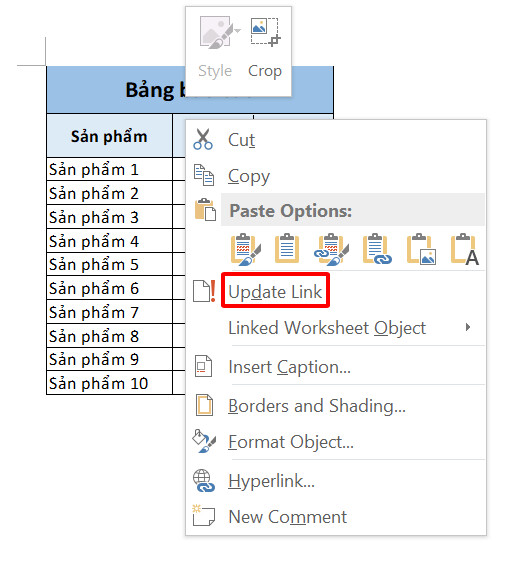
So, you have completed copying the table from Excel to Word so that the data is automatically updated in Word when there is a change in the Excel table. If when changing the data you do not see the 2 tables match, right-click on the Word table and select Update Link .
Note when copying the table with the link to the original data table:
There is no need to open both Excel and Word files in parallel when changing data. Because the Word table will be continuously updated based on the original Excel file each time you open the file.
In case you send a Word file to someone, make sure you include the Excel file, otherwise it will cause errors when copying the table from Excel to Word .
This method is extremely suitable for Excel files containing a large amount of complex and huge data. You can select a small part of it to put into your Word report without any problem when changing the data in the Excel file.
In case the following table inserting an Excel table into Word does not display fully due to large data size or incompatible table format, you need to know how to fix the error of overflowing tables in Word to make the Word file look neater and more professional.
3. How to copy from Excel to Word: Embed a table in Word
In the above 2 parts, we are required to keep 2 Word and Excel files in the device’s memory. In this part, we will learn how to embed an Excel table into Word to create an Excel spreadsheet right on the text page.
How to copy Excel table into Word by embedding table
Here are the steps to embed an Excel table into Word:
Step 1: Select the entire Excel table and press Ctrl+C or right-click and select Copy.
Step 2: Switch to the Word file and place the mouse cursor where you want the table to appear.
Step 3: Go to Home tab > Clipboard group > arrow under Paste icon > Paste Special .
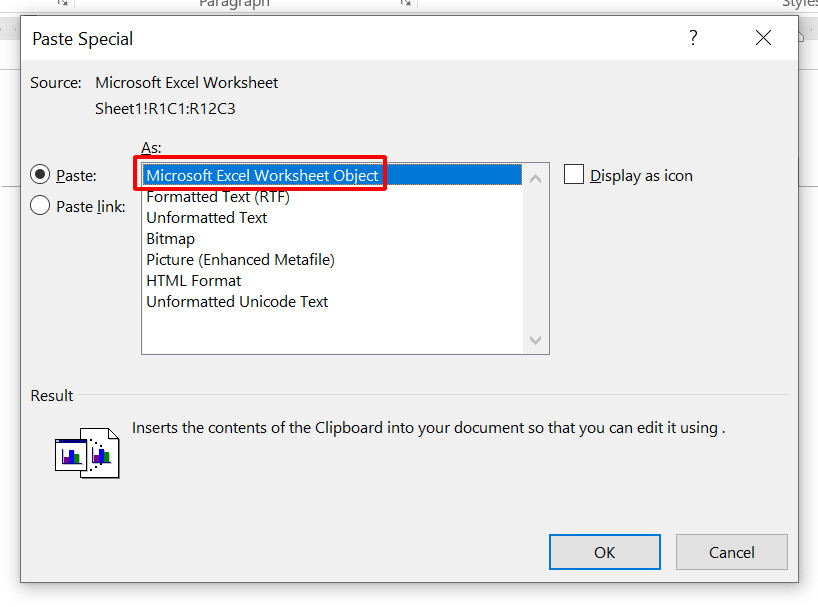
Step 4: Select Paste > Microsoft Excel Worksheet Object. Then click OK .
After waiting for a while, you will see that the Excel table has been copied to Word. This process is essentially Word creating a new Excel file and displaying the table from that file.
If you don’t believe it, double-click on the table you just created in the Word file. You will see the Excel sheet containing the above spreadsheet appear right in the Word text editor as shown in the image below:
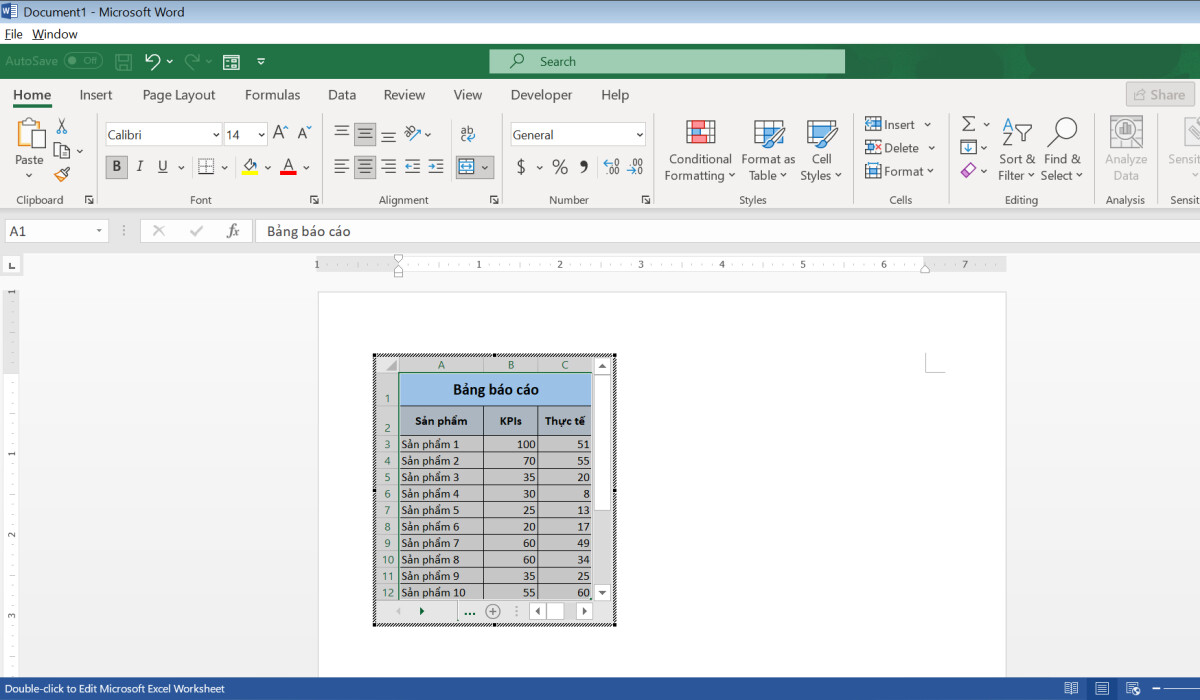
You can set up calculation functions for your data table or format the information displayed in the table, for example apply Filter to filter data, or Conditional Formatting to color specific cells.
Some notes when embedding tables in Word
The biggest advantage of this method is that you have integrated 2 files into one and only need to operate on Word. When you share this file with others, they also do not need the original Excel file to see the full data that has been transferred.
However, this method can slow down the software and there is a risk of overloading if the amount of data to be embedded is too heavy. At this time, Word not only runs the open document but also runs the entire file transferring data from Excel to Word.
Therefore, if you find the waiting process after clicking OK in the Paste Special dialog box is too long, this is the cause. There is a possibility that Word will suddenly stop responding, so you should consider carefully the size of the Excel file before applying this method.
4. How to copy a table from Excel to Word using image format
If you are finishing the final steps of your report and no longer need to change any data, processing the table in image format is a good suggestion to copy the table from Excel to Word without skipping lines. This is a simple and easy method with the following steps:
Copy Excel to Word using image format
The steps to copy an Excel table to Word in image format are performed as follows:
Step 1: Select the entire Excel table and press Ctrl+C or right-click and select Copy.
Step 2: Switch to the Word file and place the mouse cursor where you want the table to appear.
Step 3: Go to the Home tab > on the Clipboard group > click the arrow under the Paste icon > Paste Special.
Step 4: Select Paste > Picture (Enhanced Metafile) > Then press OK.
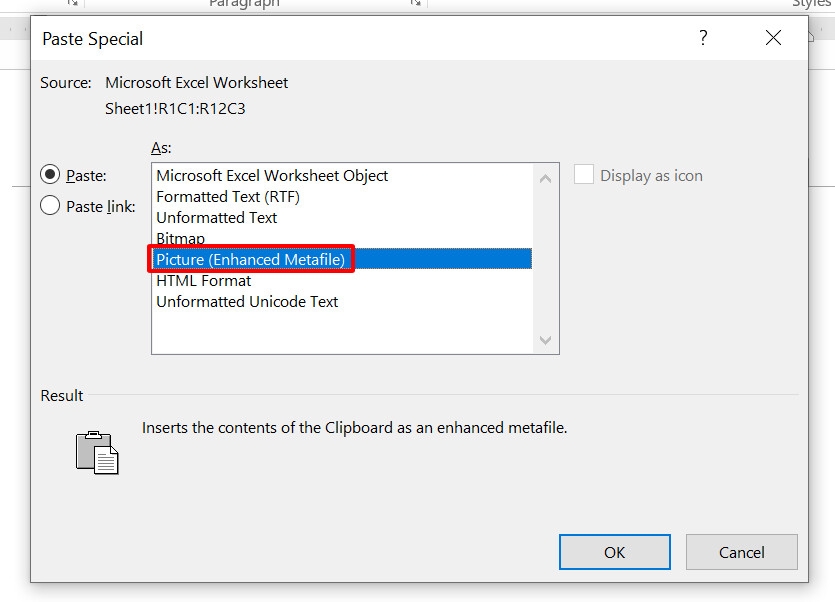
So, you have copied the Excel table to Word in image format . Once you have the image, you can freely edit it like any other normal image.
How to insert link into table in image format
If you still want your image to remain flexible and be able to update based on changes to the original file, follow these steps:
Step 1: Select the entire Excel table and press Ctrl+C or right-click and select Copy.
Step 2: Switch to the Word file and place the mouse cursor where you want the table to appear.
Step 3: Go to Home tab > Clipboard group > arrow under Paste icon > Paste Special.
Step 4: Select Paste link > Picture (Enhanced Metafile) > Then click OK.
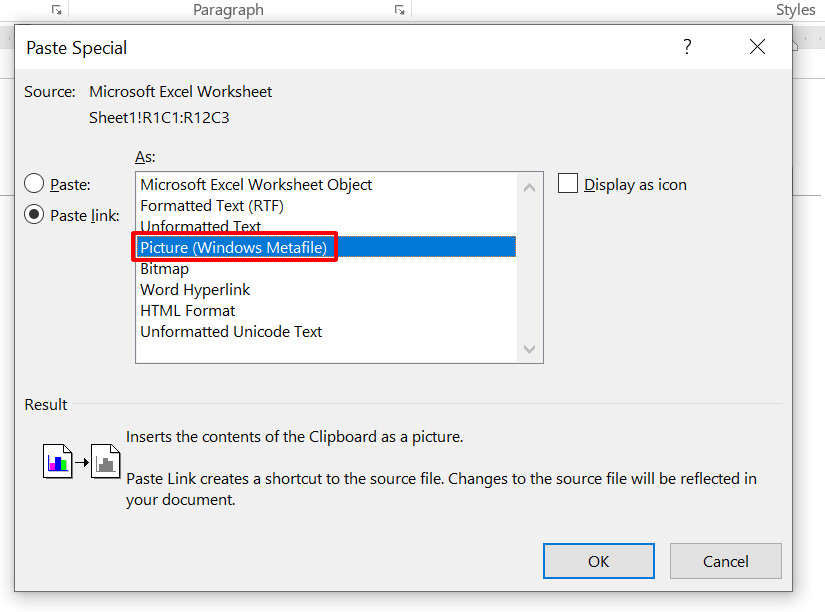
This is how to copy from Excel to Word without skipping lines but still be able to automatically update data when editing the original file. Because the image just created contains a link to the original file, remember that you need to keep both Word and Excel files on your computer.
In case the Excel file is deleted or renamed, the image you copied to Word will retain the same format as a normal image.
See more: 4 ways to convert uppercase to lowercase in Excel without errors
