Microsoft Word is one of the most used word-processing tools. However, not many people know some tricks such as dividing text into multiple columns in Word to make it easier to read. In today’s article, I will guide you how to divide text into multiple equal columns and delete columns in the simplest way!.
Nội dung
1. Instructions for dividing columns in Word
1.1 How to divide columns in Word using the Page Layout tab
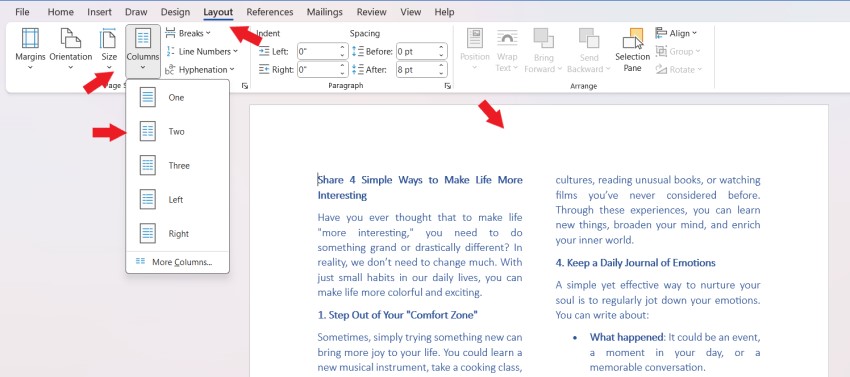
Step 1 : Highlight the text that needs to be divided into columns > Select Layout .
Step 2 : Select Columns > Select Two (If you want to divide 2 columns equally) or select Three (If you want to divide 3 columns equally).
I choose to split the text into 2 columns, the result will be as follows:
How to split columns unevenly in Word
If you want to divide 2 columns unevenly, for example the left column is larger than the right or vice versa, you do the following:
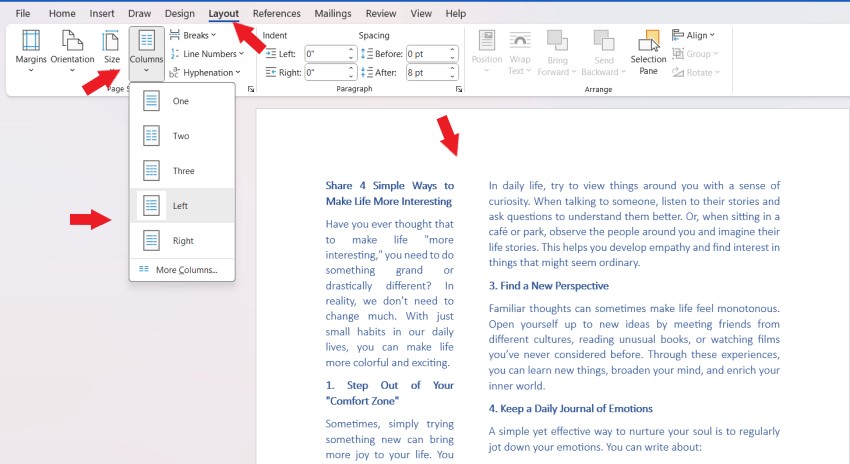
Step 1 : Highlight the text that needs to be divided into columns > Select Layout .
Step 2 : Select Columns > Select Left (If you want the left column to be smaller than the right column), select Right (If you want the left column to be larger than the right column).
I chose Left format for the text and this is the result.
How to split more columns in Word
If you want to split text into more than 3 columns, follow these steps:
Step 1 : Highlight the text that needs to be divided into columns > Select the Layout tab .
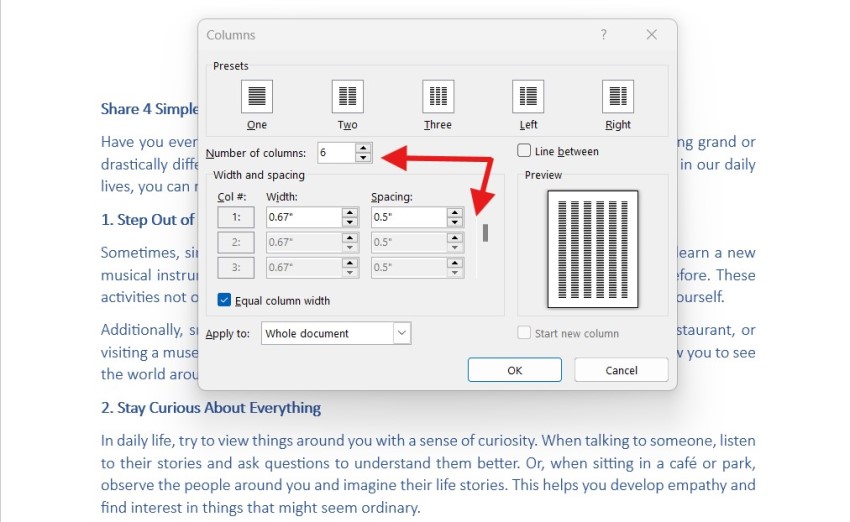
Step 2 : Select Columns > Click More Columns.
Step 3 : The Columns dialog box appears.
In the Number of columns section , enter the number of columns you want to split > Click OK .
1.2 Instructions on how to split columns in Word using the Table tool
Unlike the Page Layout tool, users can split text columns in Word through the Table tab to adjust the size and enter content into each column. However, you can only split columns in this way in the blank space in the document. How to split columns in Word using the Table tool is as follows:
Step 1: Open the document file in Word and click on the “Insert” tab on the Menu bar. Next, click on “Table” to create a table.
Step 2: Suppose you want the text to be presented in 2 columns, then move the mouse to the squares to select the 2 x 1 Table format to create a table of 2 columns and 1 row.

Step 3: Now, the screen displays a table with 2 columns and 1 row. In the upper left corner of the table, right-click on the plus sign and select “Table Properties…”.
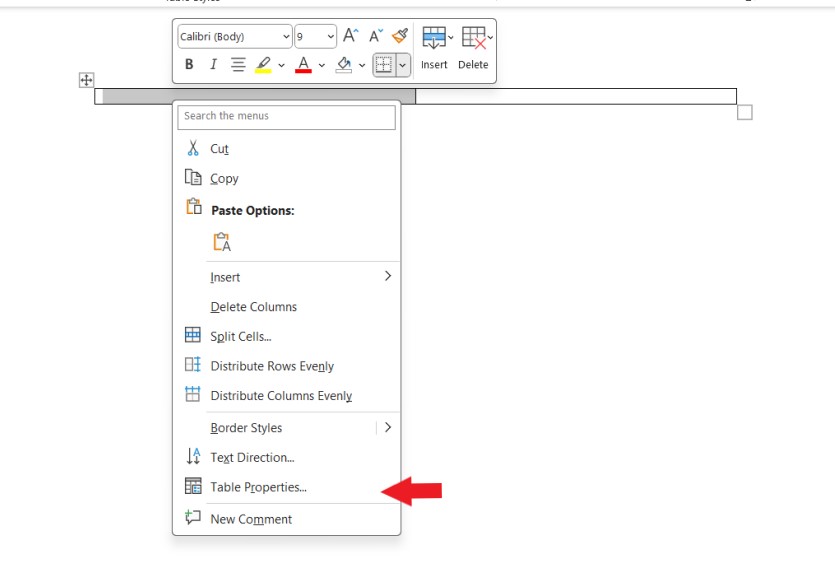
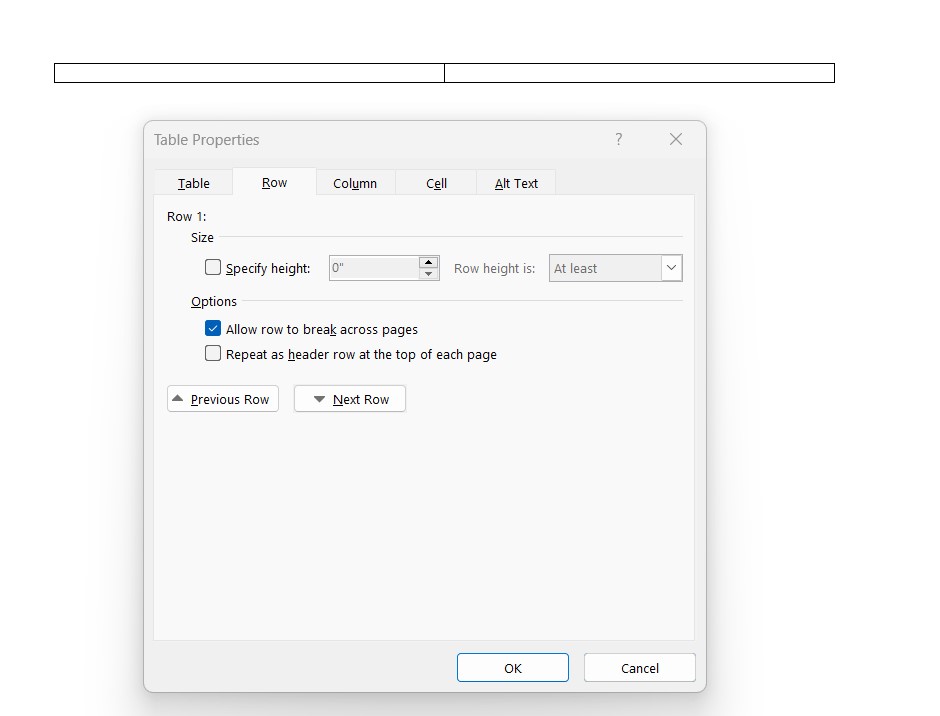
Step 4: In the Table Properties window, switch to the “Row” tab and uncheck “Specify height”. Then check “Allow row to break across pages” below to continue.
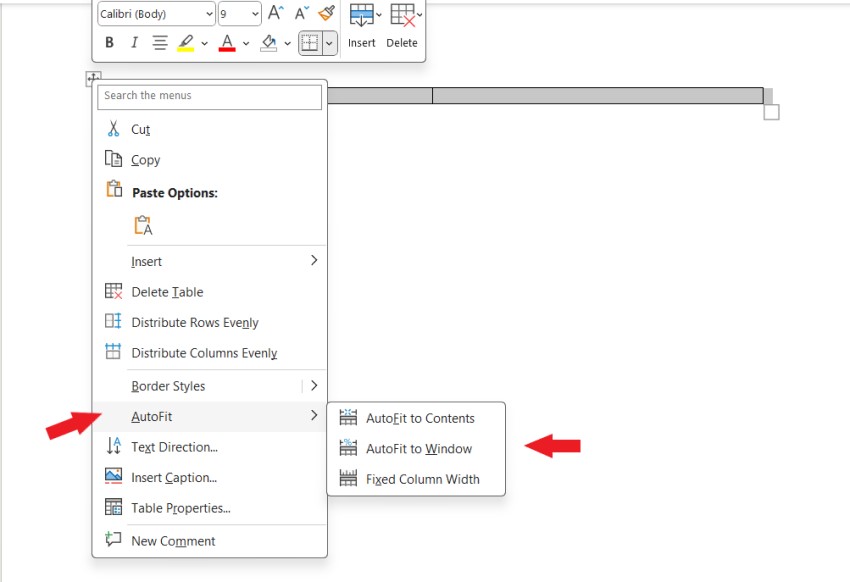
Step 5: Now, you can drag the mouse to change the width of each column. Next, select the table and right-click on the left corner square. Then click “AutoFit” and select “Fixed Column Width”.
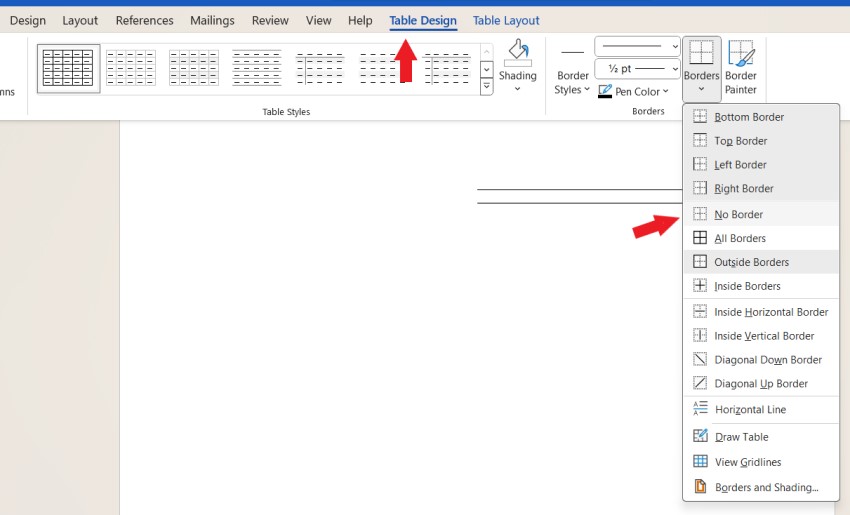
Step 6: If you want to remove the border of the table, click on the “Table Design” tab on the Menu bar. Then select “Borders”, click on “No Border” to remove the border.
After completing the method of dividing 2 columns in Word using the Table tool, you proceed to paste the copied text into the newly created table as desired.
1.3 How to split columns in Word using linked text boxes
In addition to Page Layout and Table, users can insert linked text boxes to divide columns when presenting in Word by following these steps:
Step 1: Open the document you want to split columns in Word, then click on the “Insert” tab. Here, click on “Blank Page” to insert a new Word page.
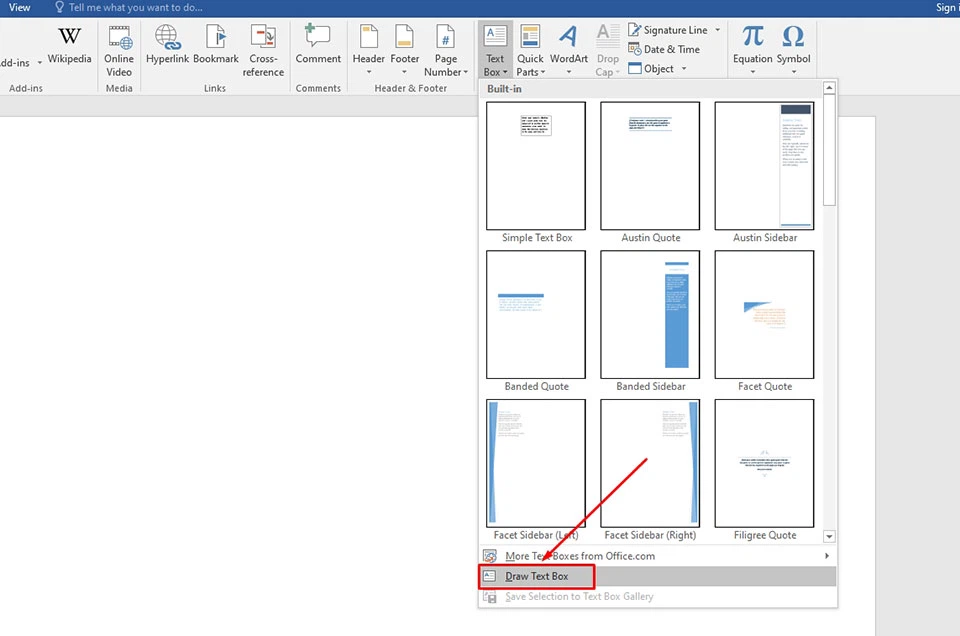
Step 2: On the first page, in the “Insert” tab, click on “Text Box” and select “Draw Text Box” to continue.
Step 3: Now, draw 2 text boxes on the left (called A1) and on the right (B1).
Step 4: Repeat step 2 again to create a new page. This ensures that you always create a new page on a blank page without affecting the links between text boxes.
Step 5: On the second Word page, you also use “Draw Text Box” to draw 2 text boxes on the left (called A2) and on the right (B2).
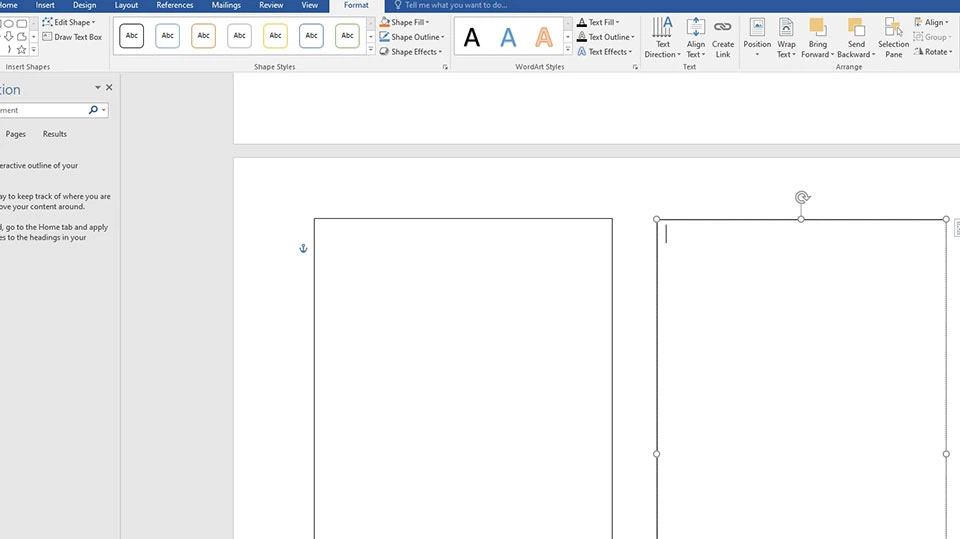
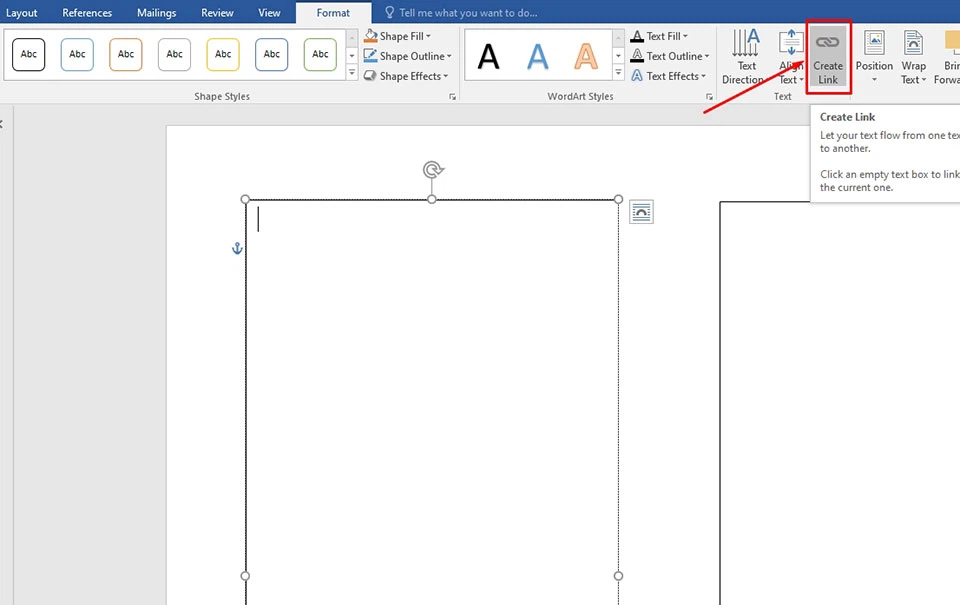
Step 6: Now, you need to make sure that the 4 text boxes A1, B1, A2, B2 are all empty. Next, click on box A1 and select the “Format” tab then click on “Create Link”. Then click on the text box you want to link, in this case A2.
Do the same to link B1 and B2. This way the text continues to flow to the linked box after the first box is full.
Step 7: If you do not want to display the border in the text box, right-click on the border and select “Format Shape”. In the “Line” section, select “No line” and then click the “Close” button (X mark) to close and complete.

2. Instructions for adjusting column size and spacing
After dividing the text columns and wanting to adjust the size and spacing between columns, you can do the following:
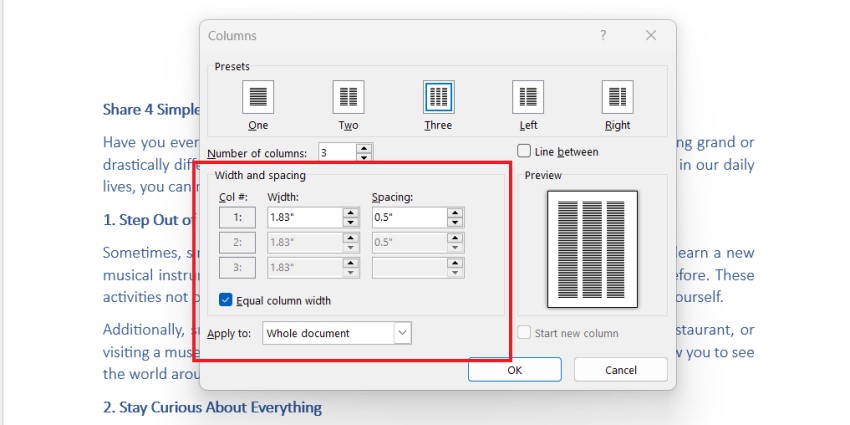
Step 1 : Place the editing cursor at the text you want to adjust > Select the Layout tab > Select Columns > Select More Columns .
Step 2 : The Columns dialog box appears. You adjust the parameters as desired.
– Number of columns : Number of columns you want to split.
– Width and spacing : Adjust the size of each column (Width) and the distance between columns (Spacing).
– Apply to:
+ This section : Apply to the current text section.
+ This point forward : Apply the text from the editing cursor forward.
+ Whole document : Apply to entire document.
The Preview section allows you to preview the settings.
After setting up, click OK to finish.
3. Instructions for adding a center line in Word
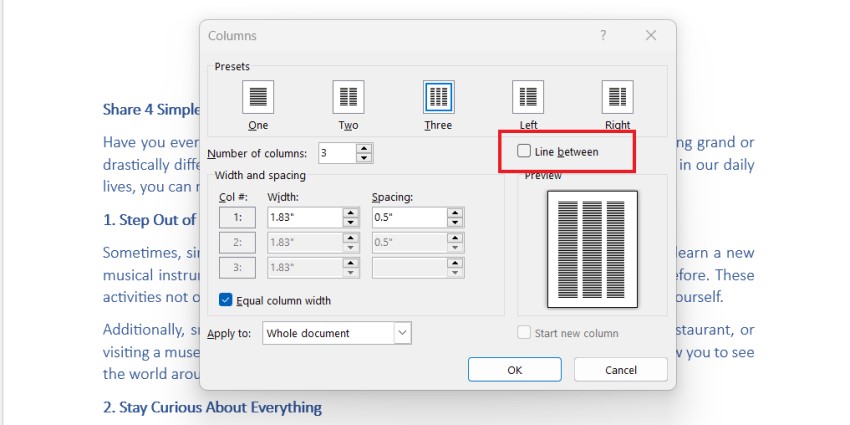
Step 1 : Place the editing cursor in the text where you want to add lines between columns > Select the Layout tab > Select Columns > Select More Columns .
Step 2 : In the Columns dialog box, tick the Line between box > Select OK .
4. Instructions for deleting split columns in Word
After splitting a column and wanting to return it to normal, you can do so by the following operation:
Method 1 : Place the editing cursor at the text section you want to remove columns from > Select the Layout tab > Select Columns > Select One and you’re done.
Now, the text you just split into columns will return to a normal paragraph.
Method 2 : If you split to preview, just press Ctrl + Z to undo and return to the previous state.
See more: 3 easy ways to add fonts to Word
