The Find and Replace feature in Word is not only used to find and replace text, but it can also be used to find and replace specific formats in a document. In today’s article, we will guide you through advanced search and replace in Word.
Nội dung
Advanced Find and Replace in Word to Change Character Formatting
When using the Find and Replace tool in Word, you can search for and replace a specific type of formatting, or you can combine text searching with wildcard characters.
1. Find and replace character formatting
Suppose you want to remove italicized text, you can do this with advanced find and replace in Word, specifically with the following steps:
Step 1: You can search for formatting without text by accessing the Find and Replace dialog box by selecting the Home tab and clicking the Replace button or pressing the Ctrl+H key combination .
Step 2: On the Replace tab, click the Find What box to locate the text in Word, then click the drop-down arrow in the Format section.
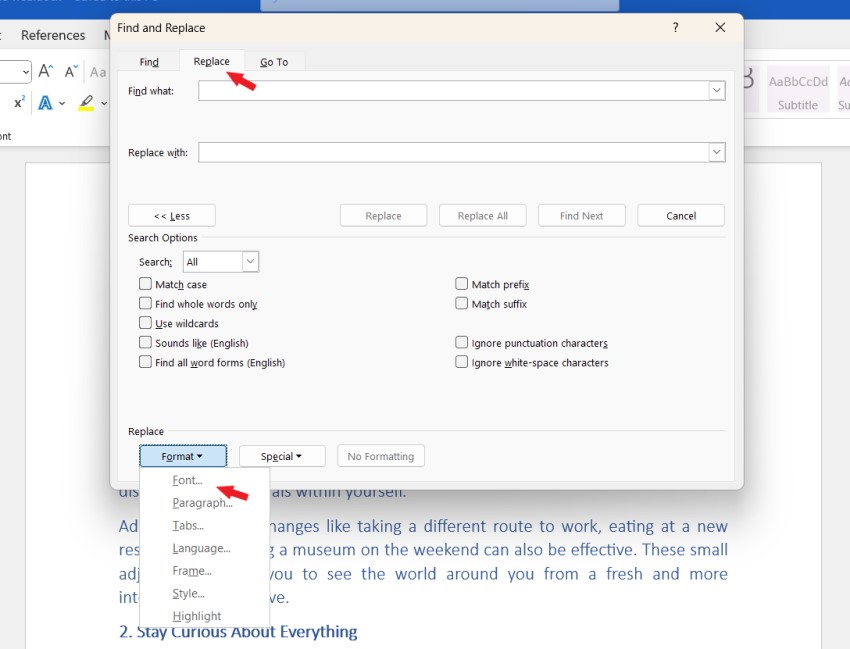
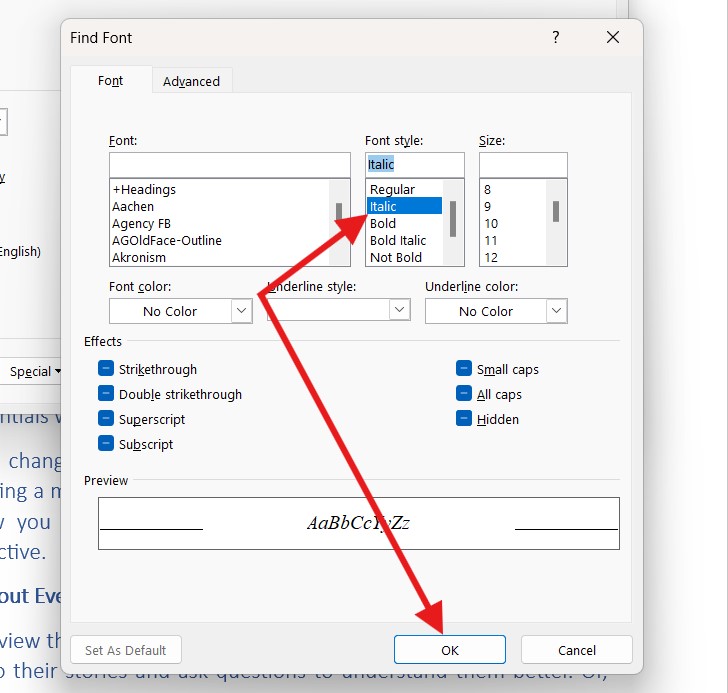
Step 3: In the Find Font window, select the type of formatting you want to search for (in this example, italic) and then click the OK button.
Step 4: Back in the Find and Replace window you should now see the search format listed under Find What .
Step 5: Next, we need to use Replace in Word. You place the mouse insertion point in Replace with > Format > Font and select the font type you want to replace (in this example, choose to change to lowercase so choose Regular ) and that format will appear under the Replace with box .
Step 6: Click the Find Next button to go to the position to replace in the text. If the position is correct, just click the Replace button in Word to replace.
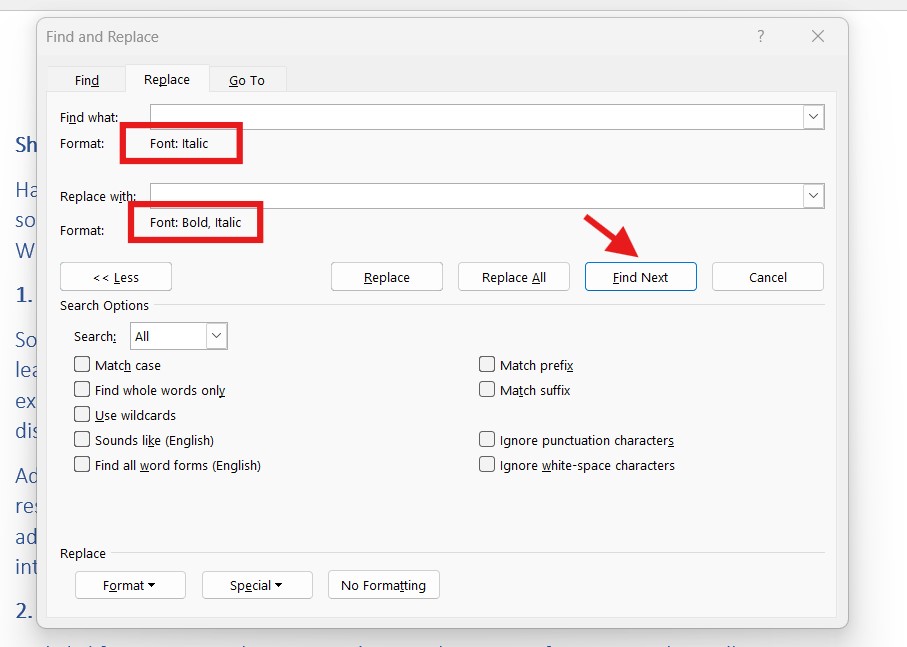
Continue clicking the Find Next button to find other replacement words or to skip a certain place. If you want to replace all found formats, just click the Replace All button .
2. Find and replace both character and text formatting
Let’s say you’ve just finished formatting a report, including bold, italics, and a blue font color for emphasis. We’ll continue with advanced find and replace in Word to complete this exercise.
The completed document will look like the image below:

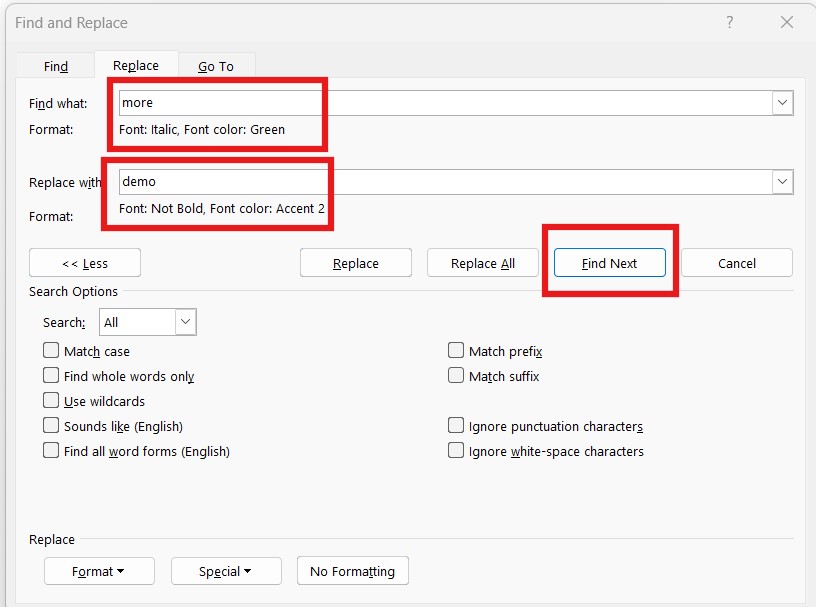
Now you need to remove the font color as well as the bold and italic formatting, and change the name More to Demo. This is where the Find and Replace feature becomes extremely useful. Here’s how to perform advanced find and replace in Word:
Step 1: Select the Home tab and then click the Replace button in Word or press the key combination Ctrl + H .
Step 2: Type Lorem Incorporated into the Find What box .
Step 3: Click the More button to expand the search options, then click the Format button and select Font .
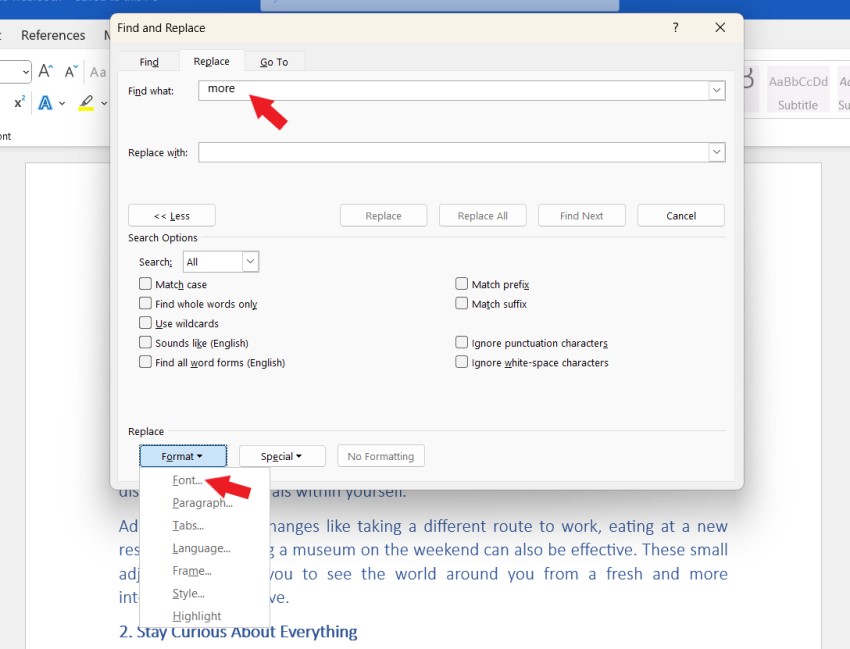
Step 4: In the Find Font window to find text in Word, select the Bold Italic option in the Font style box , in the Font Color drop-down menu, select blue and click the OK button .
Step 5: In the Replace With box , enter ”Demo” and click the Format button, select Font to apply Replace in Word.
Step 6: In the Font Style section, select Regular and in Font Color, select black as the default color of the text. Then click the OK button .
Step 7 : Now click the Find Next button to see each search result in the document, then click the Replace button in Word if you want to change each result or Replace All to replace all.
3. How to find and replace formatting in Microsoft Word.
You can also use advanced find and replace in Word to change paragraph formatting similar to how you work with character formatting, and you can also change both character and paragraph formatting at the same time if you want.
For example, let’s say you’ve just copied and pasted some text from another document into your document. Your document is using standard line spacing with no spaces before and after paragraphs and 8pt spacing after. The added text has 18pt spacing before and after and is bolded.
To format the newly added paragraph as the original text and keep the bold characters, do the following:
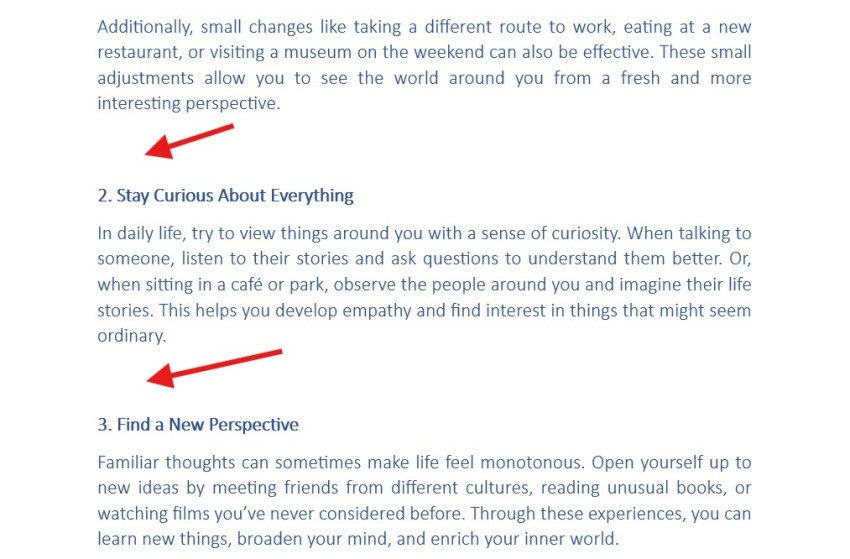
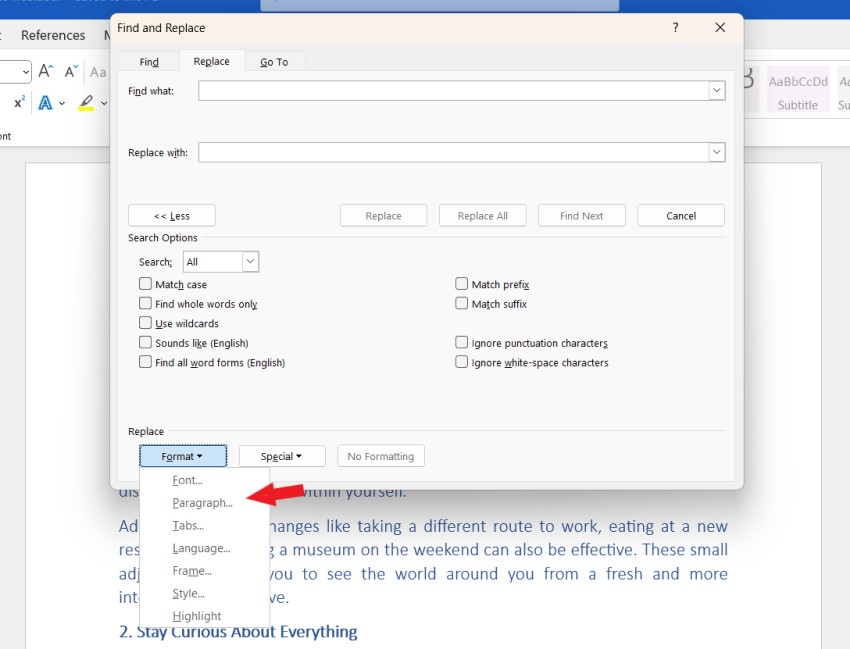
Step 1: Select the Home tab and click the Replace button or press the key combination Ctrl+H .
Step 2: In the Find What box that appears, click on the insertion point and select Format > Paragraph .
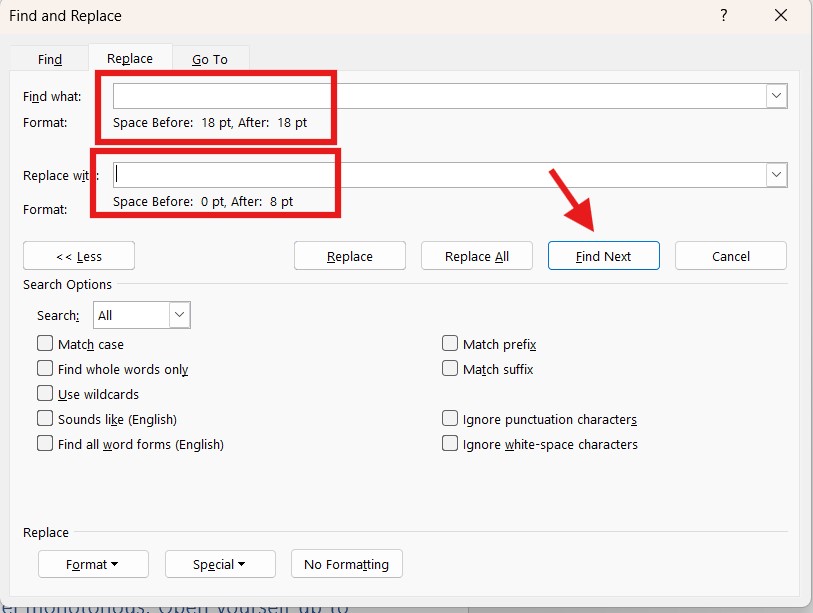
Step 3: In the Find Paragraph window to find text in Word, select the format you want to search for. Specifically in this case, the space before and after the paragraph is 18pt, then click the OK button.
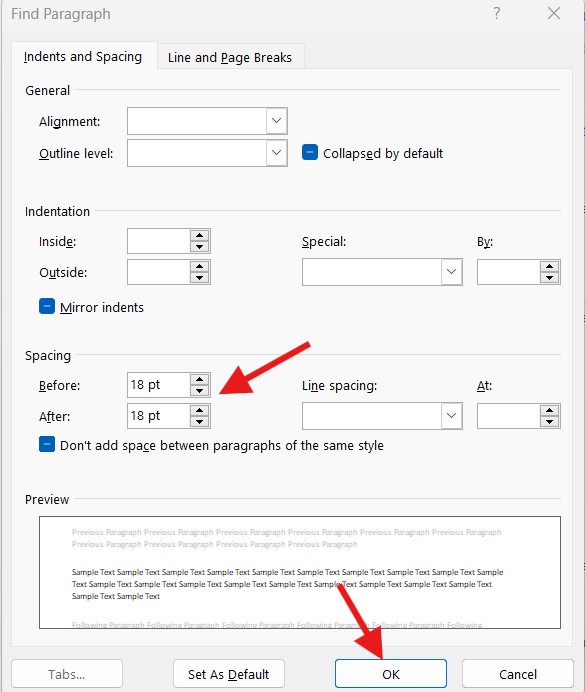
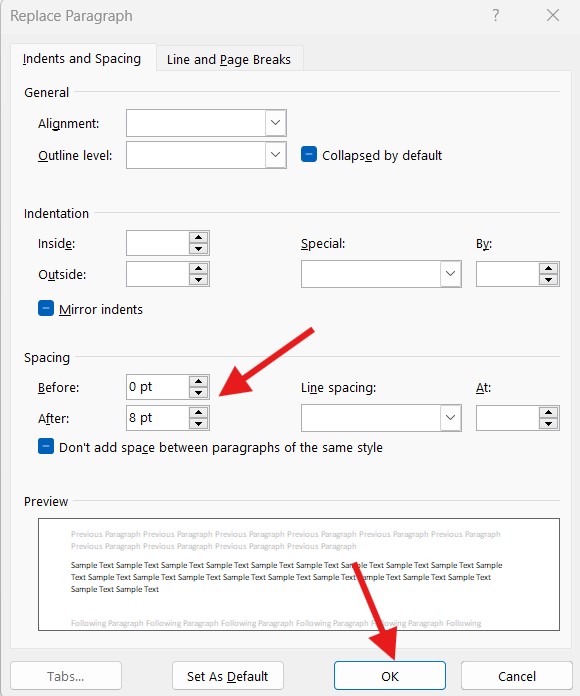
Step 4: In the Replace With box, select Format > Paragraph . In the Replace Paragraph window, in the Before section, set the spacing before to 0 and 8pt with the spacing after in the After section. Then click the OK button.
Now you click the Find Next button to start searching in the text, click the Replace button in Word if you want to replace at the selected location, if not change then click the Find Next button to move to the next format. If you want to replace all the search results then click the Replace All button .
And now you have the text as you want after completing the advanced find and replace in Word.
With just a few simple steps, you can complete your Word document easily, quickly and effectively. Hopefully, through today’s article, you have mastered advanced search and replace techniques in Word with the Find and Replace feature.
See more: Instructions on how to delete all Section Breaks in Word fastest
